Azure Pipelines 自動デプロイ(Git + ASP.NET Core)
目次
-
- 4.1. Service Connection の作成
- 4.2. Azure Pipeline の作成
- 4.3. YAML ファイルの内容
- 4.3.1. trigger セクション
- 4.3.2. pool セクション
- 4.3.3. variables セクション
- 4.3.4. steps セクション
- 4.4. 発行タスクを追加
- 4.5. デプロイタスクを追加
- 4.6. デプロイの実行
-
- 5.1. YAML ファイルをコンパクトにしてみる
- 5.2. script と task の違い
はじめに
Azure Pipelines は Azure DevOps で提供されている CI/CD を実現するためのサービスです。Azure Pipelines でできることは多岐にわたりますが、このメモ書きではソースコードを リポジトリ(Git)にプッシュ → 実行環境への自動デプロイ に的を絞って解説します。
- 自動デプロイの流れ
flowchart LR
    A[開発者] --> |プッシュ| B("リポジトリ(Git)")
    B -.-> C(Azure Pipelines)
    C --> |デプロイ| D(実行環境)
前提条件
- デプロイ先は Azure の App Service(Web アプリ)
- Web アプリは .NET 8 を使用した Razor Pages アプリケーション
- Azure DevOps プロジェクト内の Git リポジトリを使用
- Azure DevOps のプロジェクト と Git リポジトリ、Azure の App Service は作成済みであること
無料枠について
Azure Pipelines には無料枠があり、無償で自動デプロイ環境を構築できます。 ただし、現時点 1 では無料枠の利用には申請が必要となります。
無料枠については以下を参照してください。
最初から有料枠を使用するのであれば無料枠の申請は不要ですが、以下の設定を行って明示的に有料枠の使用を設定しておく必要があります。
Azure DevOps のトップ > Organization Settings(Project Settings ではない)> Billing > MS Hosted CI/CD の Paid parrallel job を 0(図1)→ 1 に変更して Save
(Self-Hosted CI/CD を変更しても無意味なのでご注意ください)
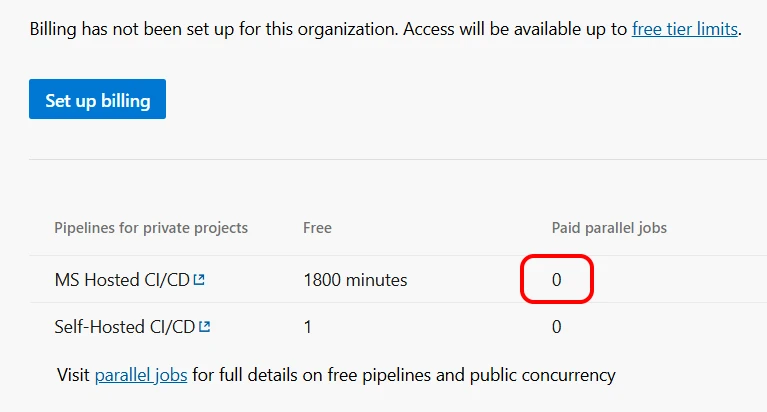
はじめて有料枠の設定を行う場合は「Set up billing」ボタンからのサブスクリプション設定も必要です。
私はずっと無料で利用しているので、このボタンは表示されたままになっています。
Free の箇所に「1800 minutes」と表示されているのは、無料で 1800分/月のパイプライン(自動デプロイ)を実行できるということを意味しています。制限を超えた場合は、翌月までパイプラインが実行されなくなります。
手順
1Service Connection の作成
まずはじめに Service Connection というものを作成する必要があります。
Service Connection は Azure DevOps のパイプラインから外部サービスへアクセスするための認証付きの接続設定です。外部サービスとは GitHub のリポジトリや Azure の App Service などのリソースを指します。Azure DevOps から見ると Azure も外部サービスになるので、その接続設定が必要というわけです。
flowchart LR
    A[Azure DevOps] -->|Service Connection| B(Azure App Service)
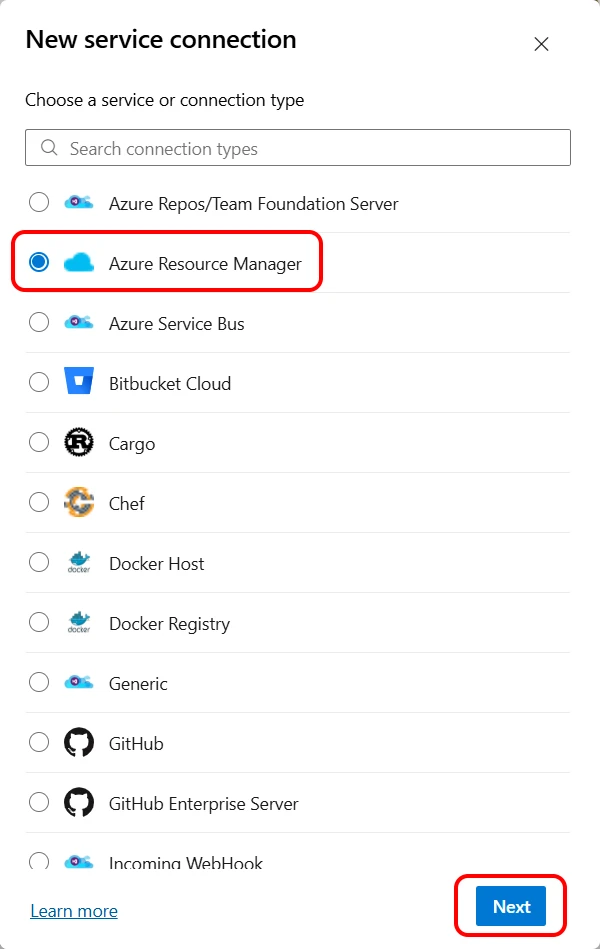
プロジェクト の Project Settings > Service connections > New service connection をクリックし、
Azure Resource Manager を選択して Next ボタンをクリックします(図2)。
Service connection の内容を設定します(図3)。
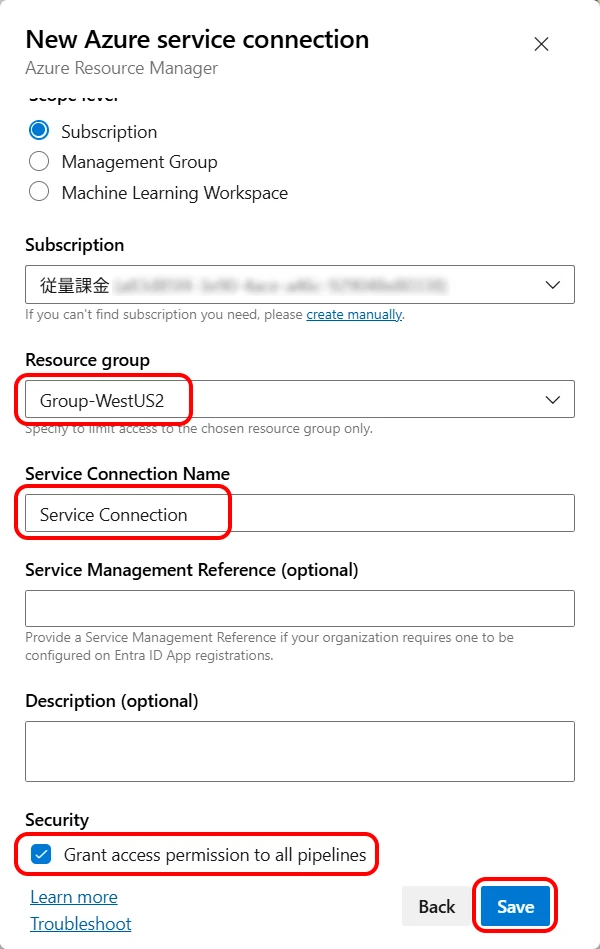
- Subscription を選択
- Resource group を選択
デプロイ先の App Service のリソースグループを選択します。 - Service Connection Name を入力
Service Connection を識別するための名称(ここでは Service Connection にしました) - Grant access permission to all pipelines にチェック
Pipeline すべてがこの Service connection を使用できるようになります。
Pipeline 単位で許可を制御したい場合は未チェックのままにします。
他は初期値のまま「Save」ボタンをクリックします。
※Resource group 以下の項目は後から変更できます。
これで Service Connection の作成は完了です。
2Azure Pipeline の作成
次にデプロイを実行するパイプランの定義ファイル(YAML ファイル)を作成します。
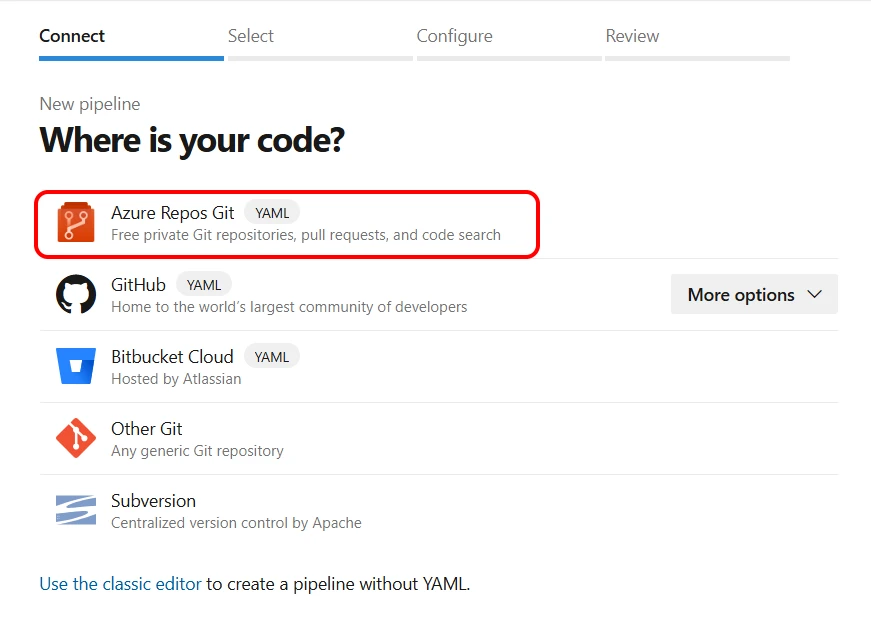
Pipelines > Create Pipeline > Azure Repost Git(図4)> 対象のリポジトリを選択します
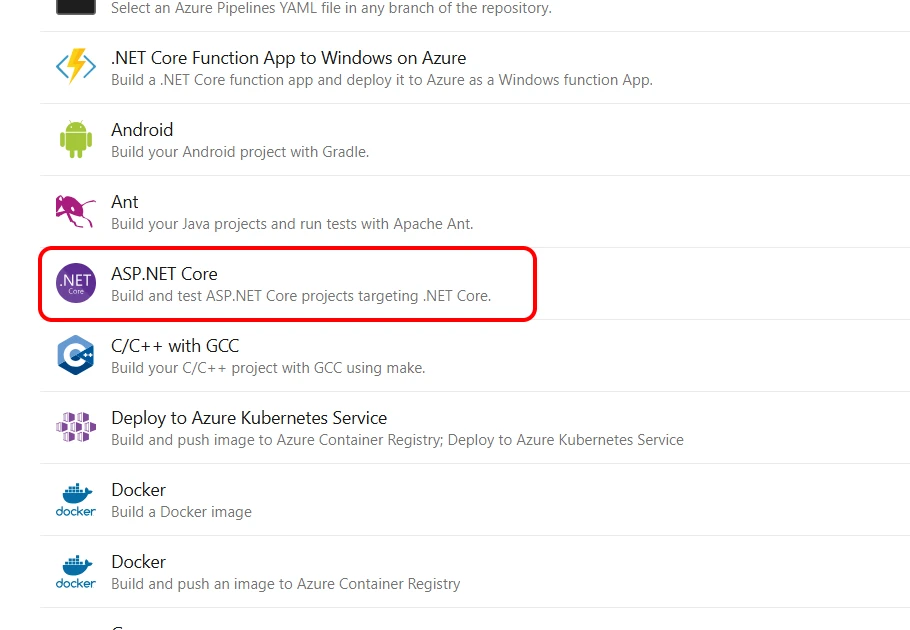
Configure your pipeline で ASP.NET Core を選択します。(図5)
紛らわしいですが、ASP.NET や ASP.NET Core (.NET Framework) ではなく、ASP.NET Core と表示されているものを選択してください。
テンプレートの YAML ファイルが表示されます(図6)。
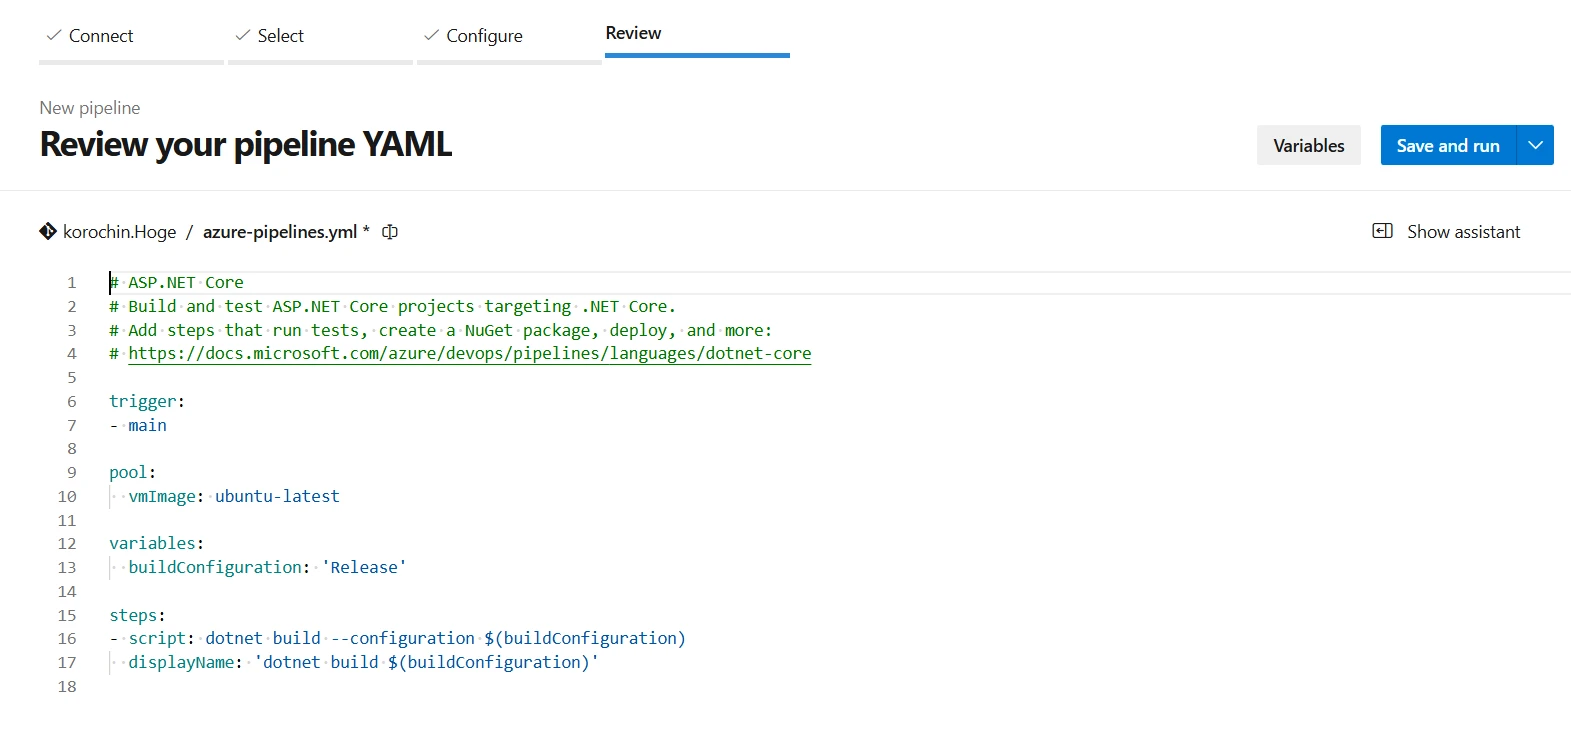
そのまま内容を変更せずに、右上の「Save and run」ボタンを押してみましょう。
コミットメッセージを入力するダイアログが表示されます(図7)。
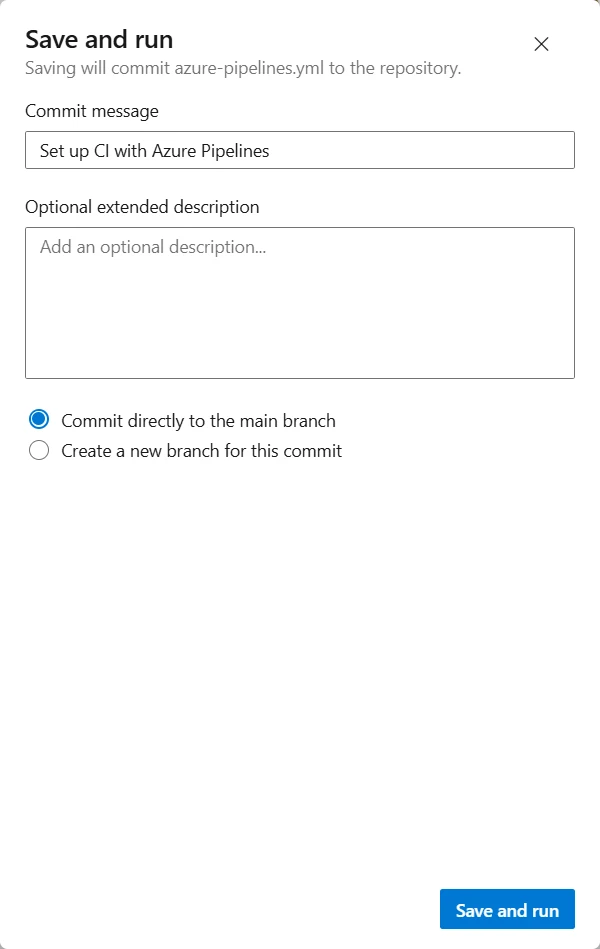
ここで「Save and run」ボタンを押すと、既存のリポジトリのルートフォルダーに azure-pipelines.yml という名前で YAML ファイルが追加され、リポジトリにプッシュされます。
「Save and run」を押します。
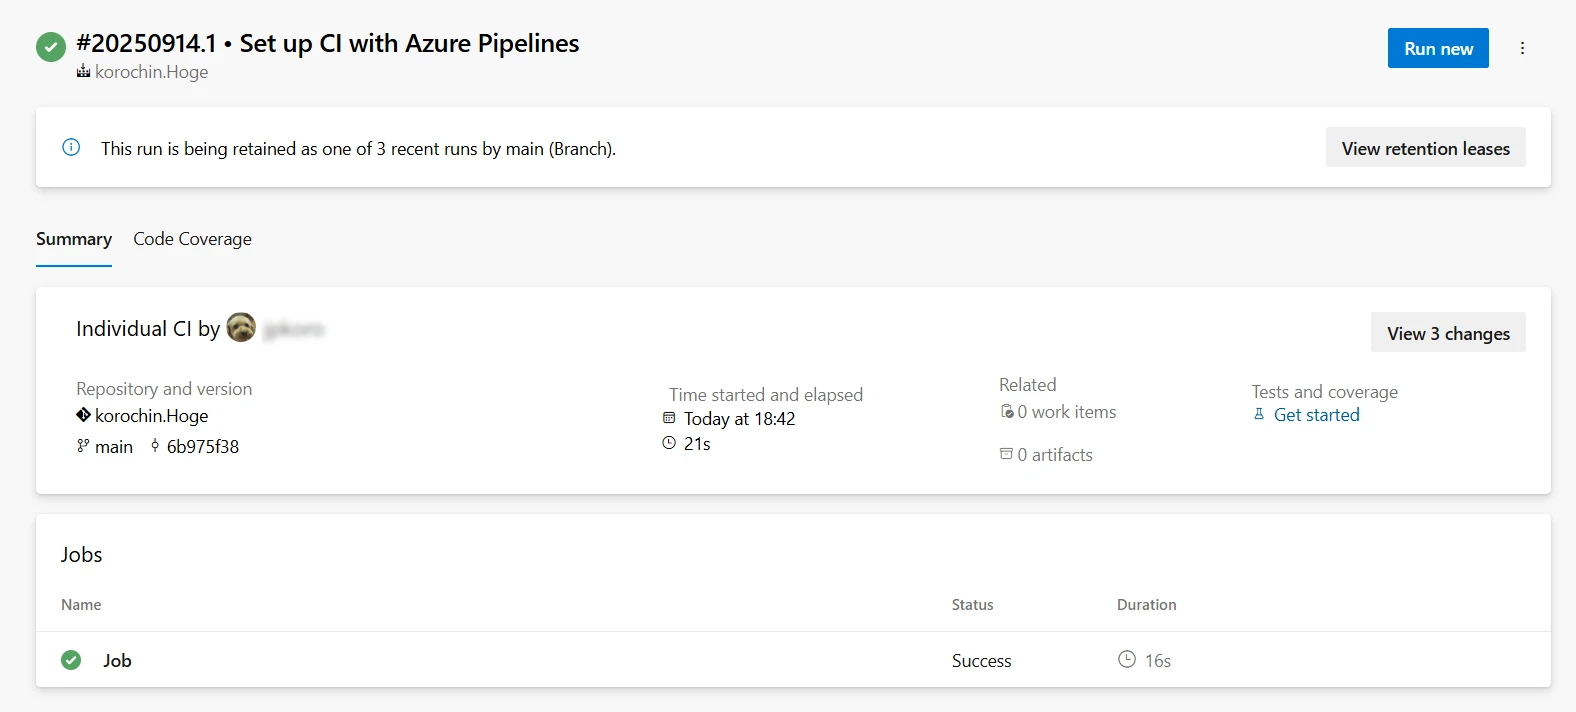
しばらくすると、以下のような Pipeline の実行中画面が表示されます(図8)。
一番下の Status 欄に「Queued」と表示されています。これは Pipeline の実行リクエストがキューに追加されているけれど、まだ実行されていないことを表しています。

そのまま待ちましょう。
またしばらくすると、Status が「Running」に変わり、最後に「Success」になります。
背景が緑色のチェックマークが表示されます。
これが Pipleline の実行が正常に終了した状態になります(図9)。
3YAML ファイルの内容
ここまでの手順でデプロイが行われたのか?というと、そうではありません。
実行されたのはビルドのみです。テンプレートの YAML ファイルの内容を詳しく見てみましょう。
# ASP.NET Core
# Build and test ASP.NET Core projects targeting .NET Core.
# Add steps that run tests, create a NuGet package, deploy, and more:
# https://docs.microsoft.com/azure/devops/pipelines/languages/dotnet-core

trigger:
- main

pool:
  vmImage: ubuntu-latest

variables:
  buildConfiguration: 'Release'

steps:
- script: dotnet build --configuration $(buildConfiguration)
  displayName: 'dotnet build $(buildConfiguration)'
trigger セクション
trigger:
- main
main ブランチに push されたときに、このパイプラインが自動的に実行されます。
pool セクション
pool:
  vmImage: ubuntu-latest
パイプラインを実行する仮想マシンイメージを指定します。
ubuntu-latest は最新の Ubuntu 環境を指します。
パイプラインを実行するための仮想マシンですので、デプロイ先の OS に合わせる必要はありません。
flowchart LR
    A(Azure Pipeline) -.-> B[仮想マシン]
    B --> |デプロイ| C(実行環境)
variables セクション
variables:
  buildConfiguration: 'Release'
variables セクションではパイプライン内で参照する変数を定義できます。
ここでの変数は以下になります。
- 変数名:
$(buildConfiguration) - 値:
Release
steps セクション
steps:
- script: dotnet build --configuration $(buildConfiguration)
  displayName: 'dotnet build $(buildConfiguration)'
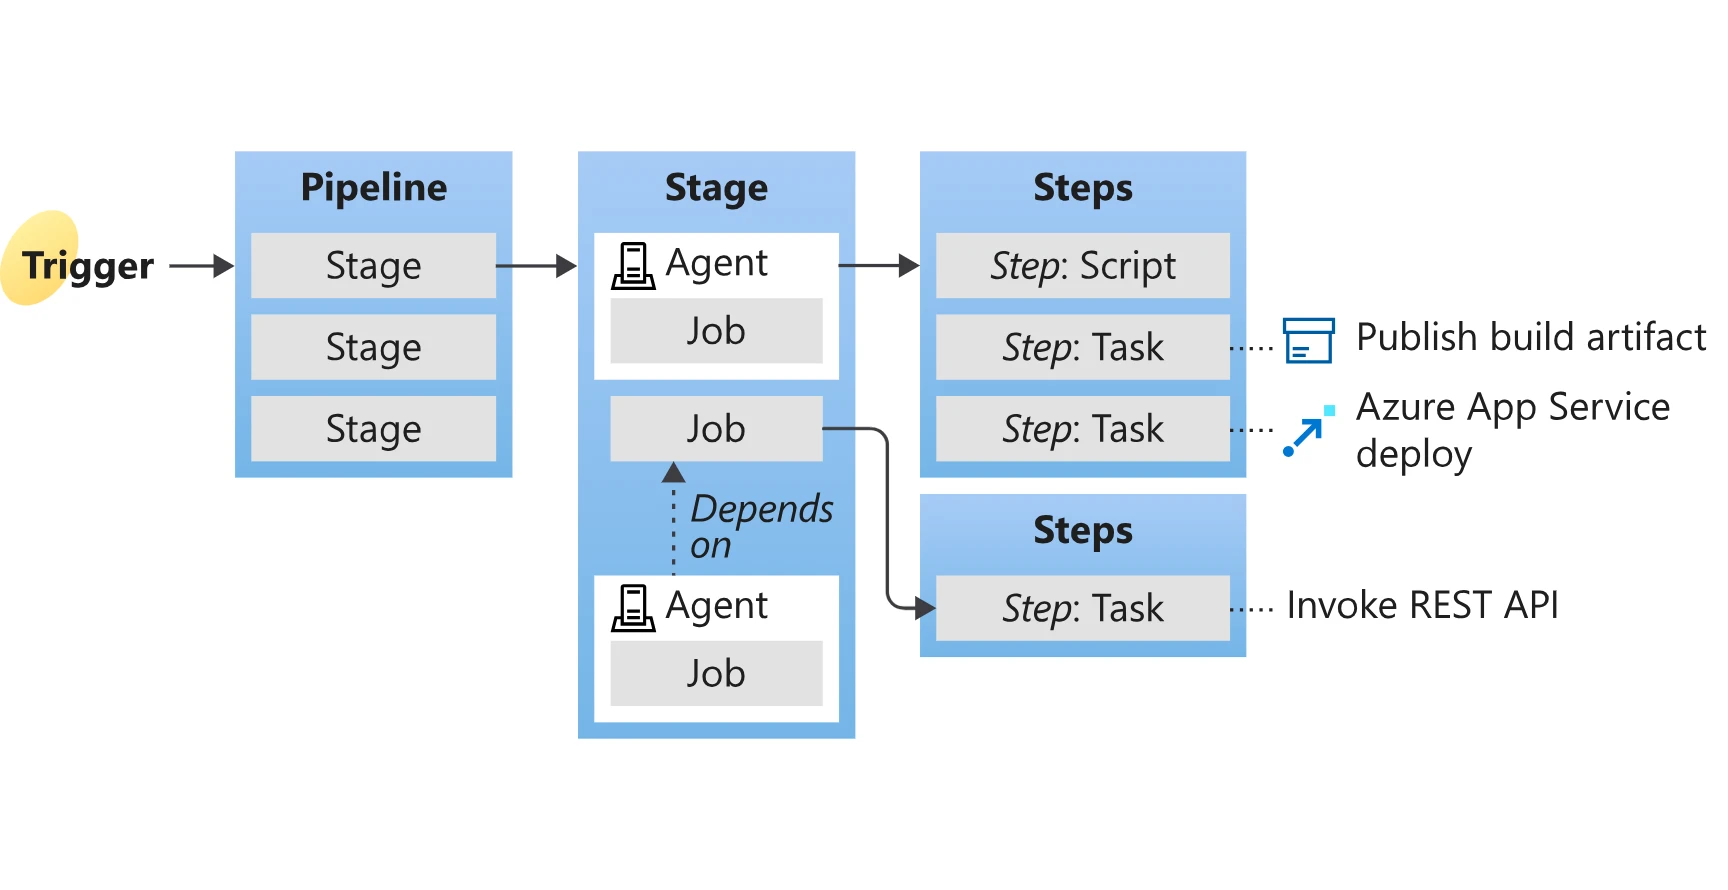
steps セクションでは、パイプラインで実行するコマンド(script)やタスク(task)などの処理(ステップ)を記述します。
dotnet buildコマンドでプロジェクトをビルド
--configuration オプションで Release モードを指定displayNameは Azure DevOps の UI 上で表示されるラベル
$(buildConfiguration)の値はReleaseなので、dotnet build Releaseと表示されます。
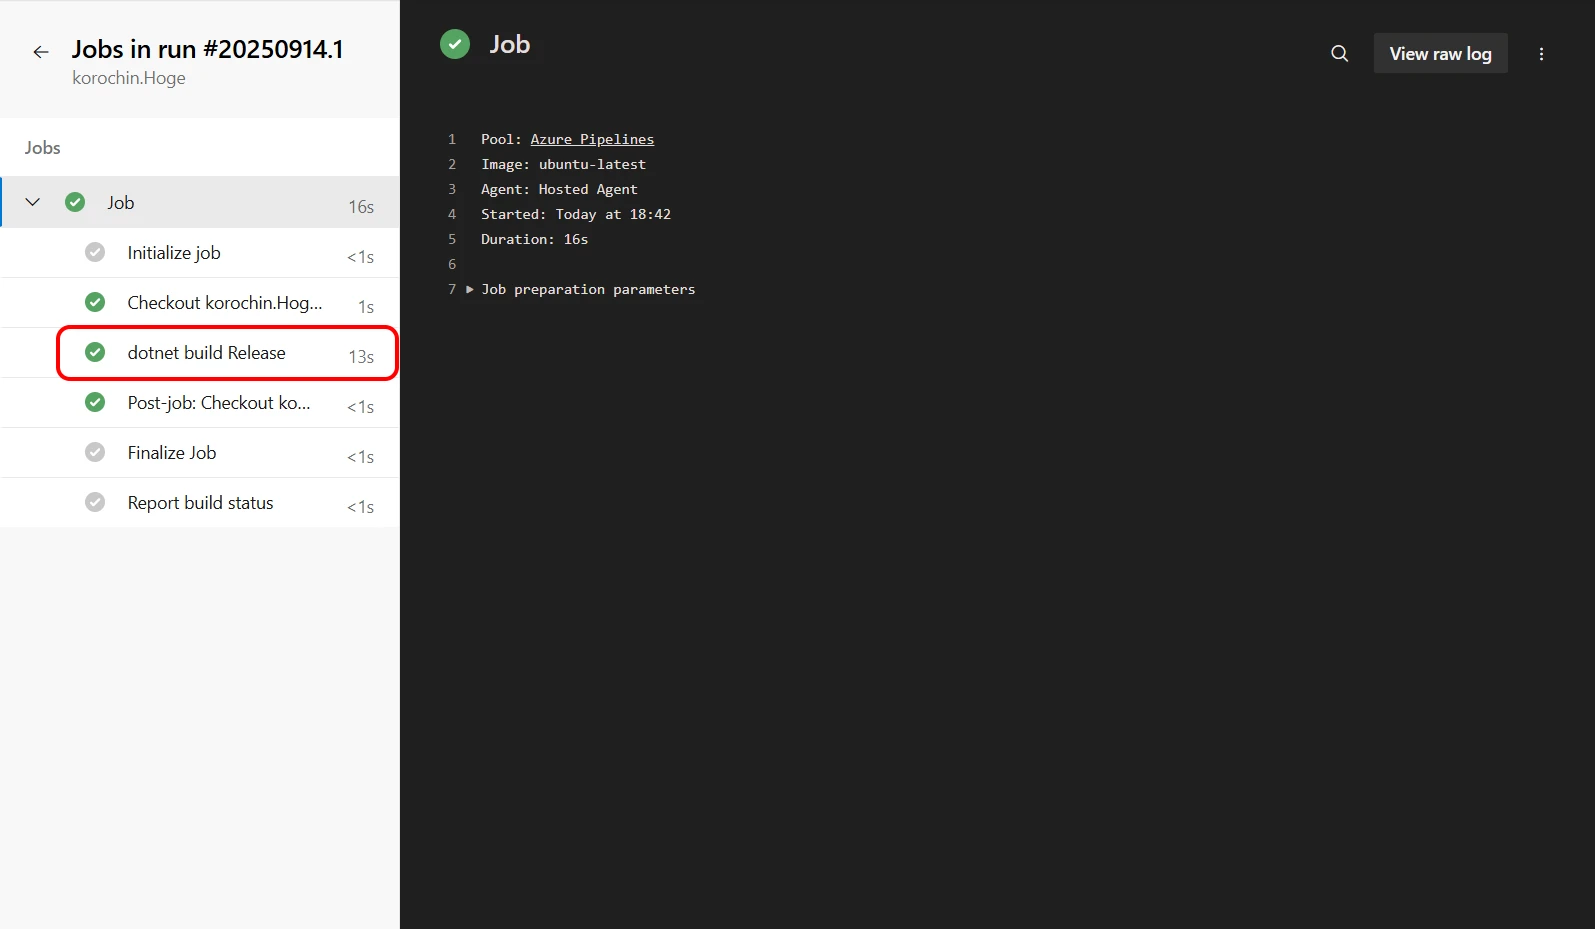
このラベルはどこに表示されるのでしょうか?
図8、図9 の Job の行をクリックするとパイプラインの実行内容の詳細画面に遷移します。
ここにパイプライン内の各処理の実行内容が表示されますが、displayName はここに表示されます(図10)。
4発行タスクを追加
今まで見てきたように、現在の YAML ファイルにはビルドまでの設定しか定義されていません。
デプロイするための設定を追加しましょう。
デプロイを実行するためには、デプロイ用に各ファイルをまとめて成果物にする必要があります。
いわゆる「発行(publish)」です。
ここでは成果物を1つの zip ファイルに圧縮します。
Azure Pipeline の GUI から発行のタスクを追加できます。
図8、図9 の右上にある三点リーダー > Edit pipleline を選択してください。
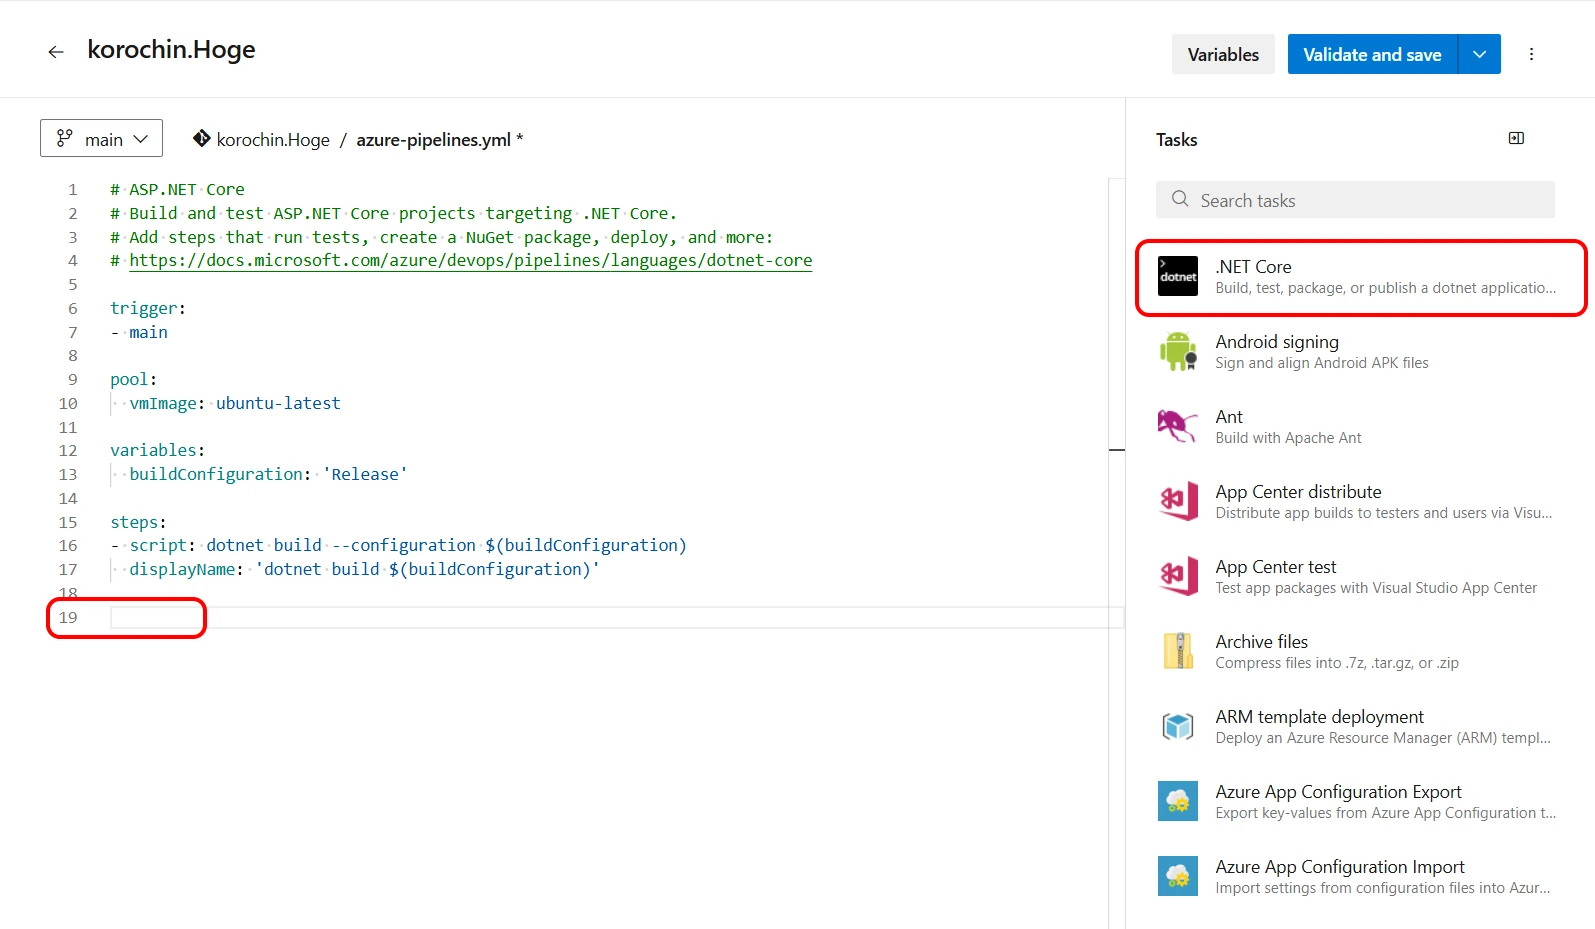
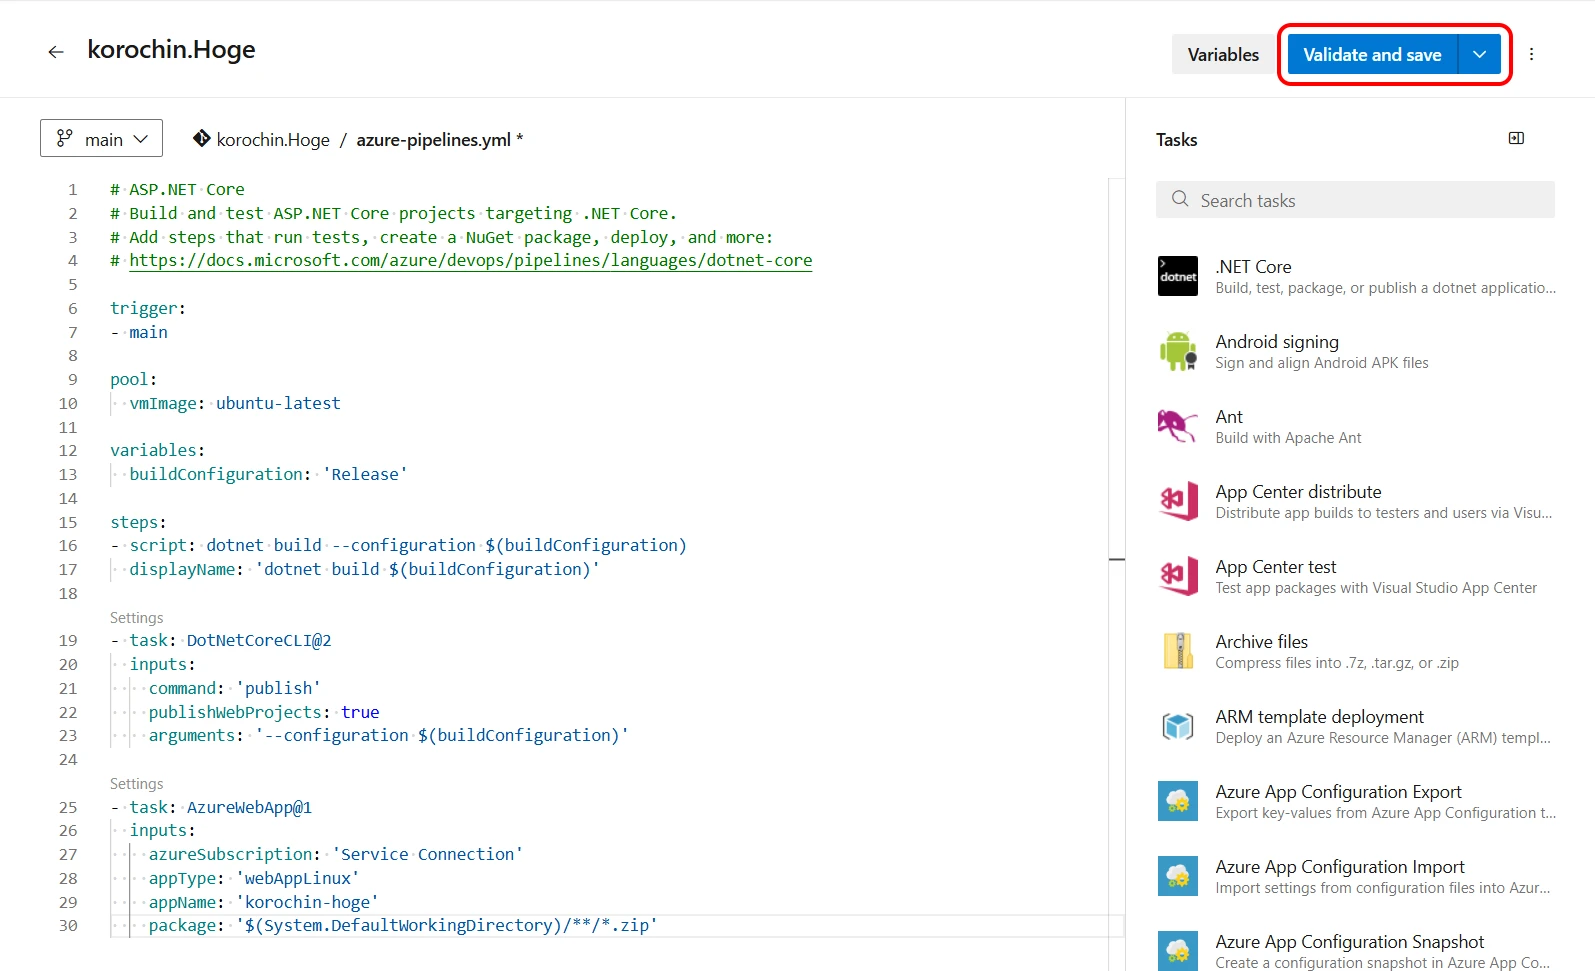
YAML ファイルの末尾にコードを追加したいので、入力カーソルを最後の行に合わせてから Tasks の .NET Core を選択します(図11)。
(Tasks が表示されていない場合は、右上の Show assistant をクリック)
以下のように入力します(図12)。
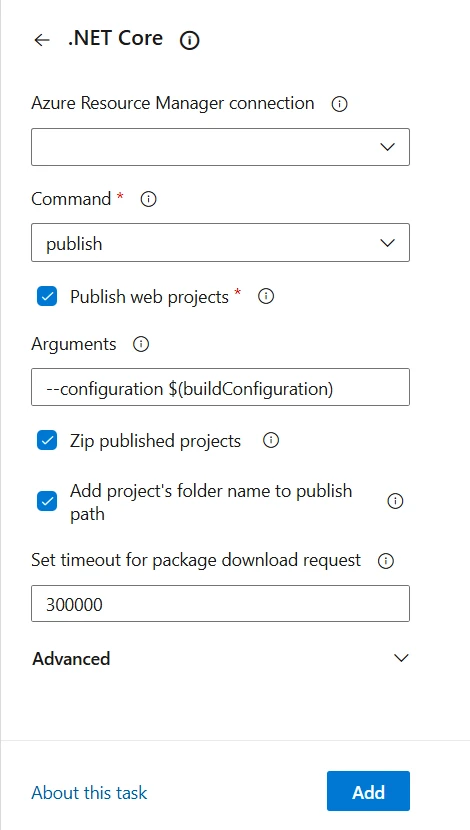
- Command:
publish - Arguments:
--configuration $(buildConfiguration)
Releaseモードでビルドします。
他はすべてデフォルトのままで「Add」ボタンをクリックします。
以下のように発行タスクのコードが追加されます(図13)。
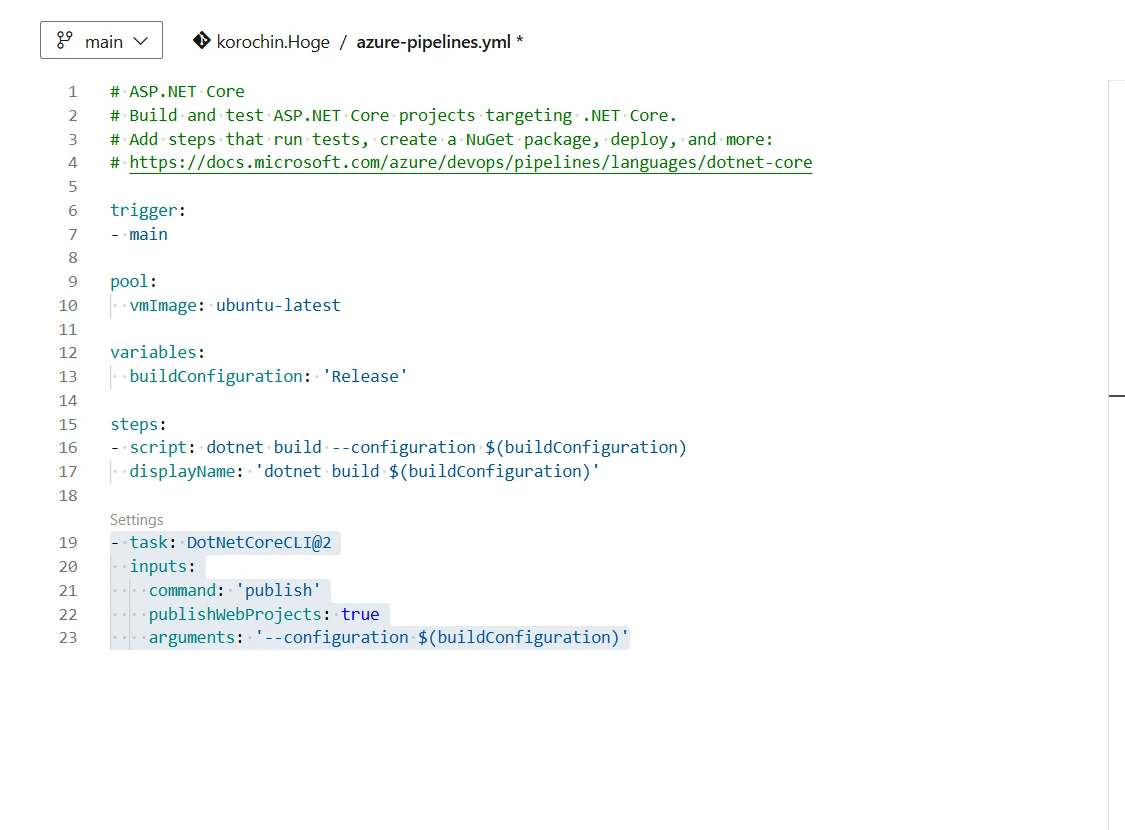
以上で発行タスクの追加は完了です。
5デプロイタスクを追加
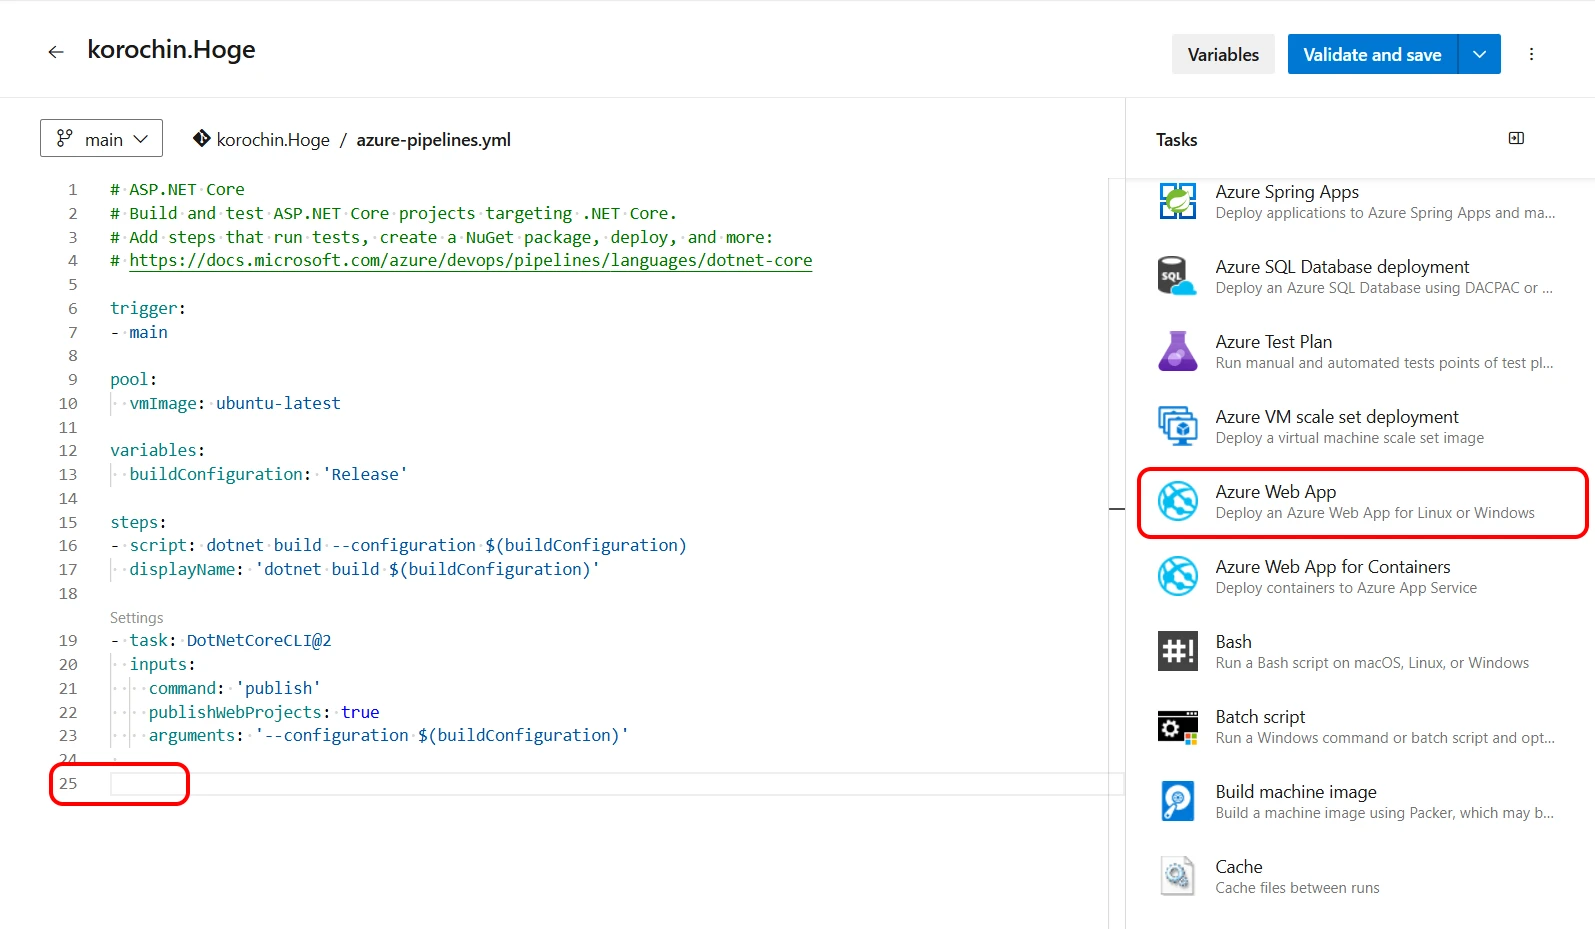
(4) と同じように入力カーソルを YAML の最後の行に合わせてから Tasks の Azure Web App を選択します(図14)。
デプロイ先の内容を選択します(図15)。
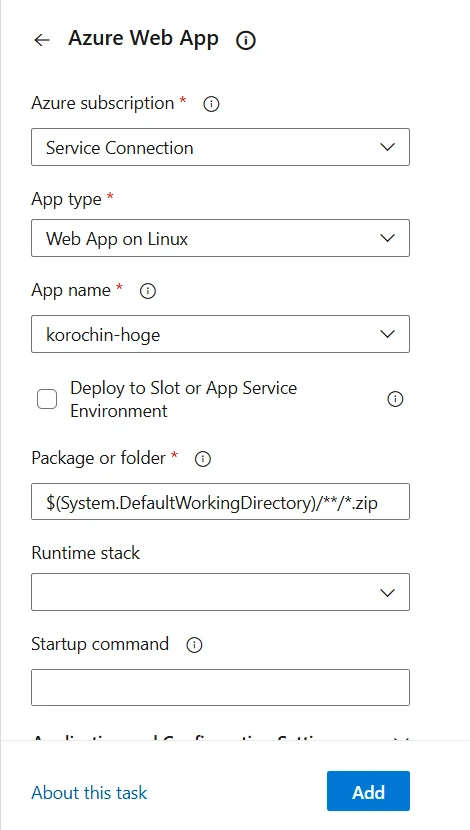
- Azure subscription
(1) で作成した Service Connection を選択 - App type
デプロイ先の種別(Windows/Linux)を選択 - App name
デプロイ先の App Service を選択
他はデフォルトのままで「Add」ボタンをクリックしてください。
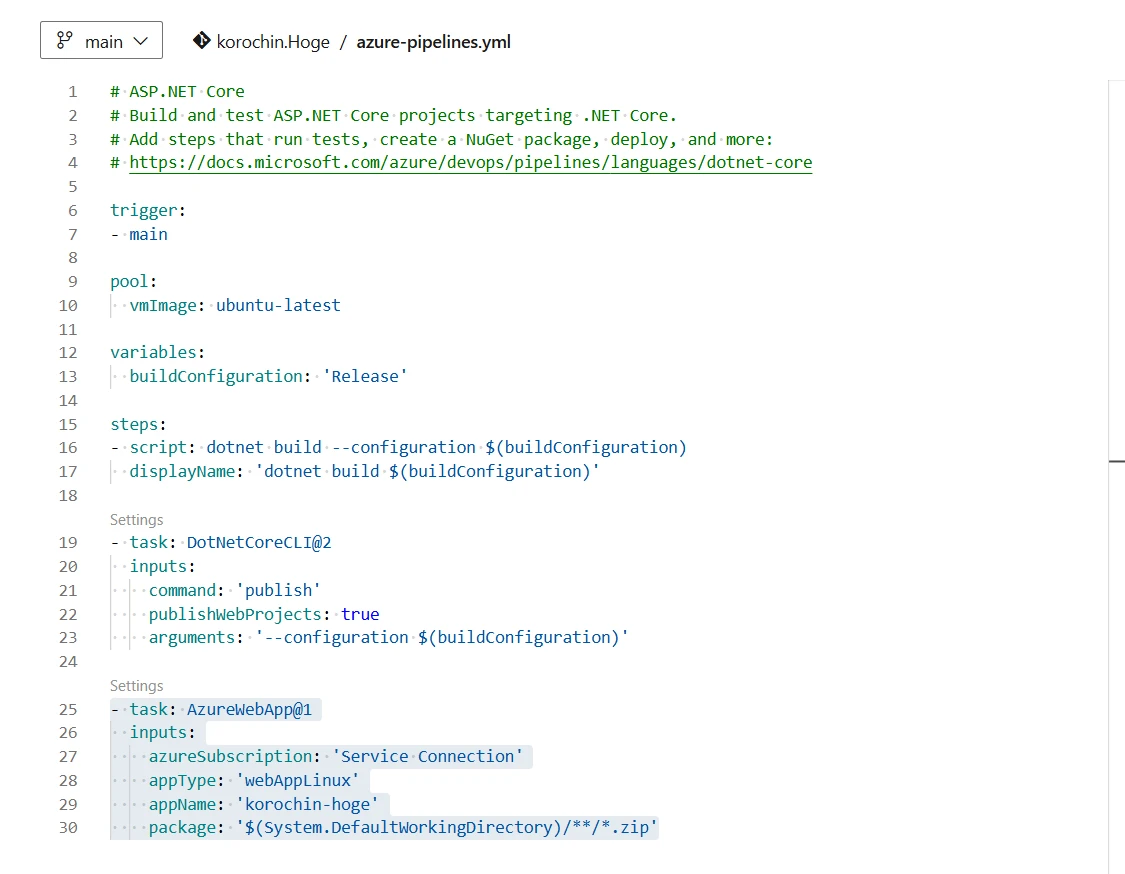
以下のようにデプロイを実行する task のコードが追加されます(図16)。
6デプロイの実行
ここまでの手順でデプロイに必要な設定はすべて完了しました。
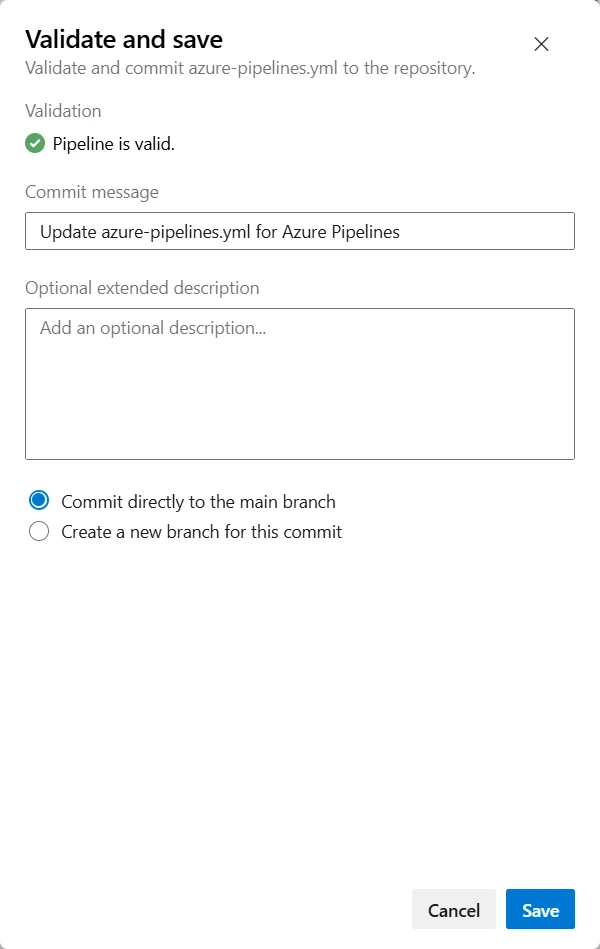
「Validate and save」ボタンをクリックしましょう(図17)。
「Save」ボタンをクリックします(図18)。
パイプライン実行中の画面に自動的に遷移します(図19)。
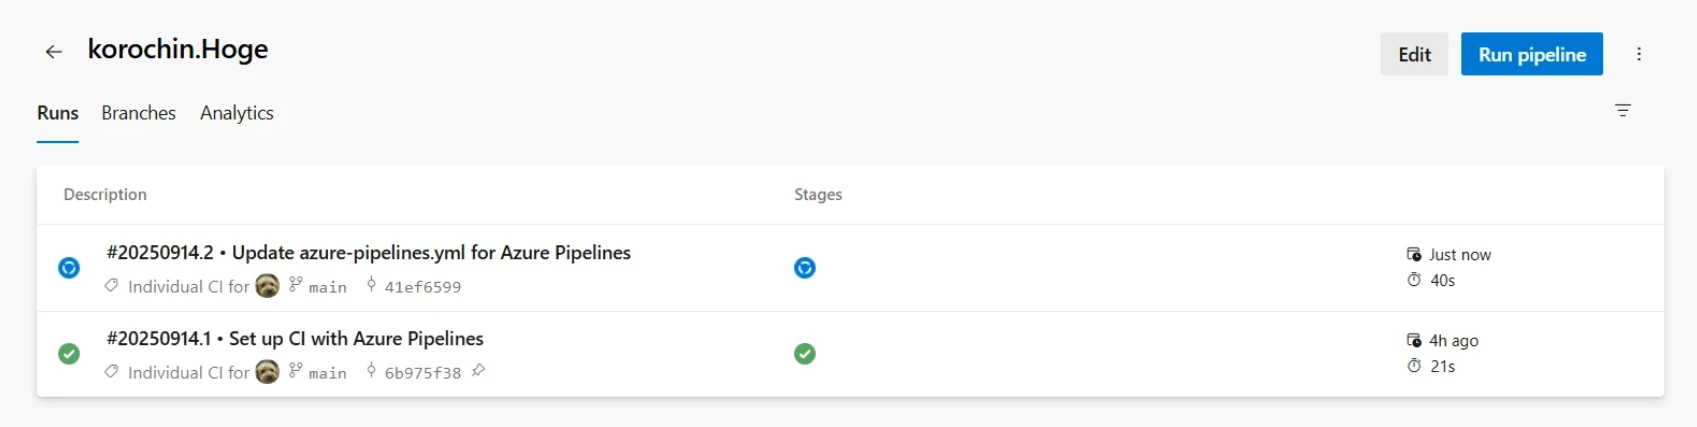
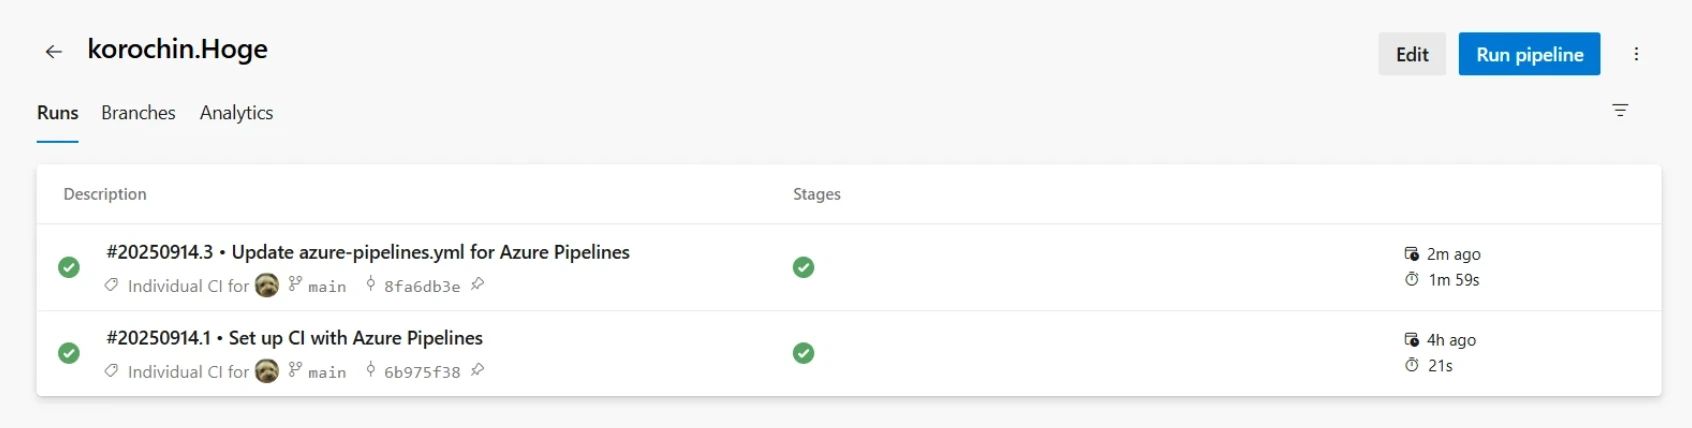
しばらくまつと、パイプライン実行が完了します(図20)。
これでデプロイは完了です。
補足など
以上で リポジトリ(Git)にプッシュ → 実行環境への自動デプロイ の設定は完了しました。
以降はリポジトリにソースコードをプッシュすると自動でデプロイされるようになります。
改めて YAML ファイルの内容を確認してみましょう。
YAML ファイルをコンパクトにしてみる
# ASP.NET Core
# Build and test ASP.NET Core projects targeting .NET Core.
# Add steps that run tests, create a NuGet package, deploy, and more:
# https://docs.microsoft.com/azure/devops/pipelines/languages/dotnet-core

trigger:
- main

pool:
  vmImage: ubuntu-latest

variables:
  buildConfiguration: 'Release'

steps:
- script: dotnet build --configuration $(buildConfiguration)
  displayName: 'dotnet build $(buildConfiguration)'

- task: DotNetCoreCLI@2
  inputs:
    command: 'publish'
    publishWebProjects: true
    arguments: '--configuration $(buildConfiguration)'

- task: AzureWebApp@1
  inputs:
    azureSubscription: 'Service Connection'
    appType: 'webAppLinux'
    appName: 'korochin-hoge'
    package: '$(System.DefaultWorkingDirectory)/**/*.zip'
上から順に以下の意味になります。
- trigger:
mainブランチがトリガー - pool: Ubuntu の最新イメージをパイプライン実行に使用
- variables: 変数の定義
- steps: ステップ(処理)の定義
- ビルド(
dotnet build) - 発行(
publish) - デプロイ(
deploy)
- ビルド(
実は、発行(publish)のタスクにはビルド(dotnet build)の処理が含まれています。
そのため、- script: dotnet build の処理は実際には不要になります。
また、Debug モードのビルドで良ければ --configuration の指定は不要になります。2
コメントも削除してみます。
trigger:
- main

pool:
  vmImage: ubuntu-latest

steps:
- task: DotNetCoreCLI@2
  inputs:
    command: 'publish'
    publishWebProjects: true

- task: AzureWebApp@1
  inputs:
    azureSubscription: 'Service Connection'
    appType: 'webAppLinux'
    appName: 'korochin-hoge'
    package: '$(System.DefaultWorkingDirectory)/**/*.zip'
これが自動デプロイを実現するための必要最小限のコードになります。
Release モードでデプロイしたい場合は、変数を使用せずに arguments: '--configuration Release' の行を追加してもOKです。
script と task の違い
- script は Pipeline を実行する仮想マシンで Bash や PowerShell などのコマンドを直接実行します。
- script: dotnet build は、仮想マシンにあらかじめ .NET SDK がインストールされていて、dotnet build を実行し、プロジェクトがビルドされるという流れになります。
- task は Azure Pipeline で定義された組み込み機能を使用します。テストやビルド、デプロイなどのさまざまなタスクが用意されています。Azure Pipelines タスク リファレンス | Microsoft Learn でタスクの一覧を確認できます。