Google Search Console API

目次
-
- 3.1. API の有効化
- 3.2. サービスアカウントの作成
- 3.3. キーの作成
- 3.4. Google Search Console にサービスアカウントを追加
-
- 4.1. Python の場合
- 4.2. C# の場合
- 4.3. API のレスポンスデータ
はじめに
Google Search Console は、Google が提供する無料のウェブサービスです。ウェブサイトが Google 検索でどのように表示されているかを監視・管理・改善するのに役立ちます。
簡単に言うと、ウェブサイトと Google 検索をつなぐコミュニケーションツールです。
Google Search Console では URL 単位でインデックスの登録状況(ウェブサイトのページが Google に正しく認識されているか)を確認できますが、Google Search Console には API が提供されており、プログラムからインデックスの登録状況を確認することができます。
以下に手順をまとめました。
前提条件
- Google Cloud Platform(GCP)のアカウントを作成済みであること
Google Search Console API は GCP で提供されている API です。 - Google Search Console に Web サイトを登録済みであること
API を使用するための準備
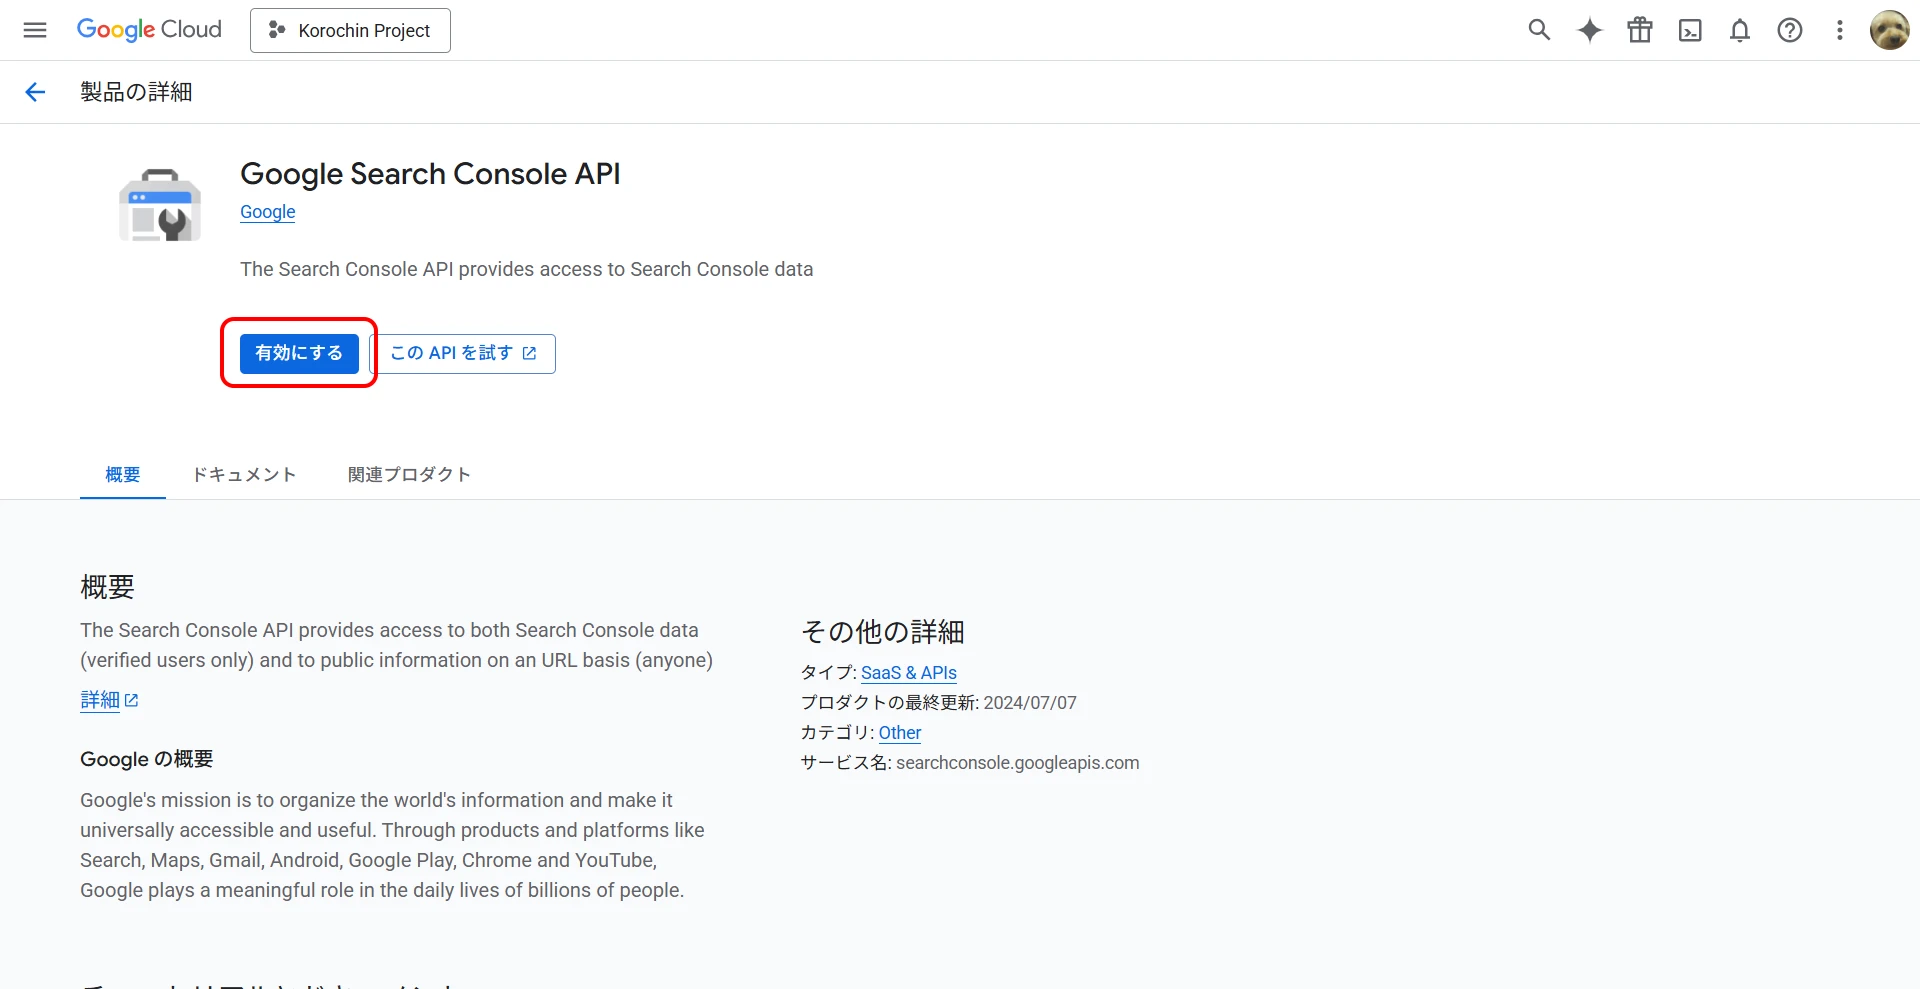
1API の有効化
GCP のメニューから API とサービス > ライブラリ を選択します。
検索バーで「Google Search Console API」を検索し、これを有効にします(図1)。
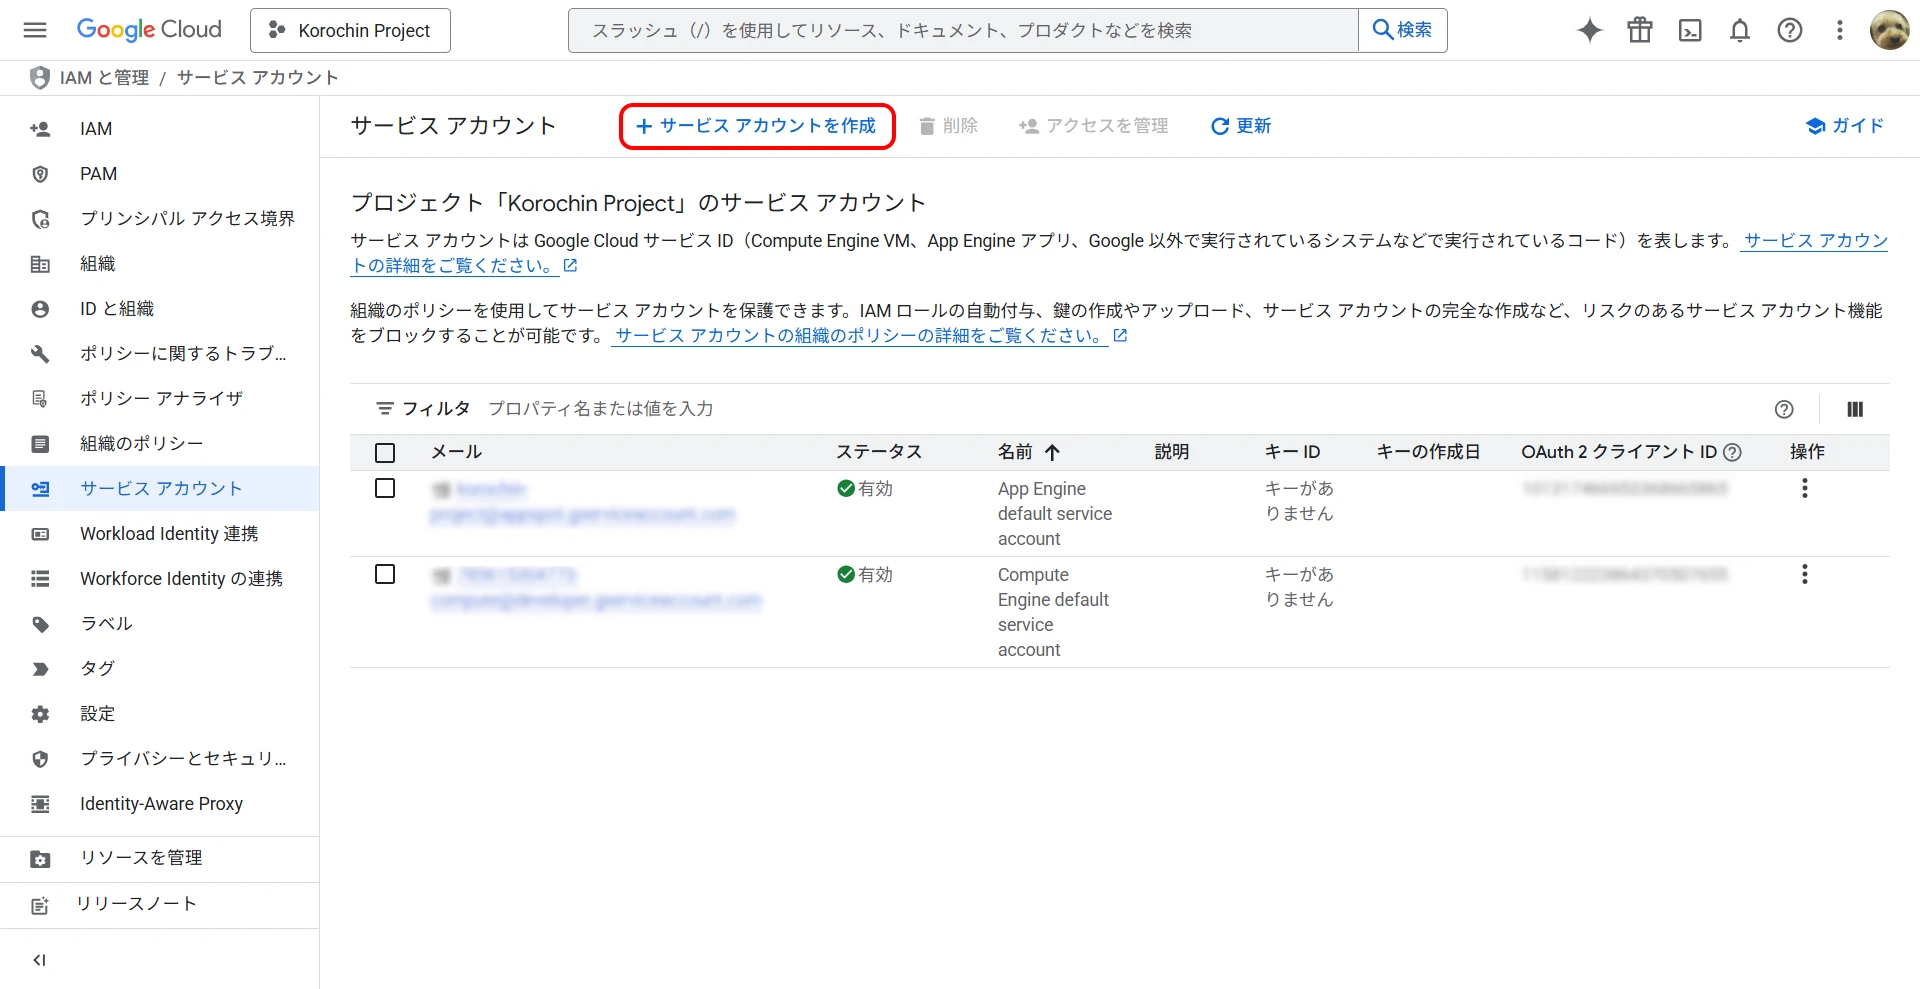
2サービスアカウントの作成
GCP のメニューから IAM と管理 > サービスアカウント に移動します。
「サービスアカウントを作成」をクリックし、アカウント名を入力して作成します。権限の追加は必要ありません。
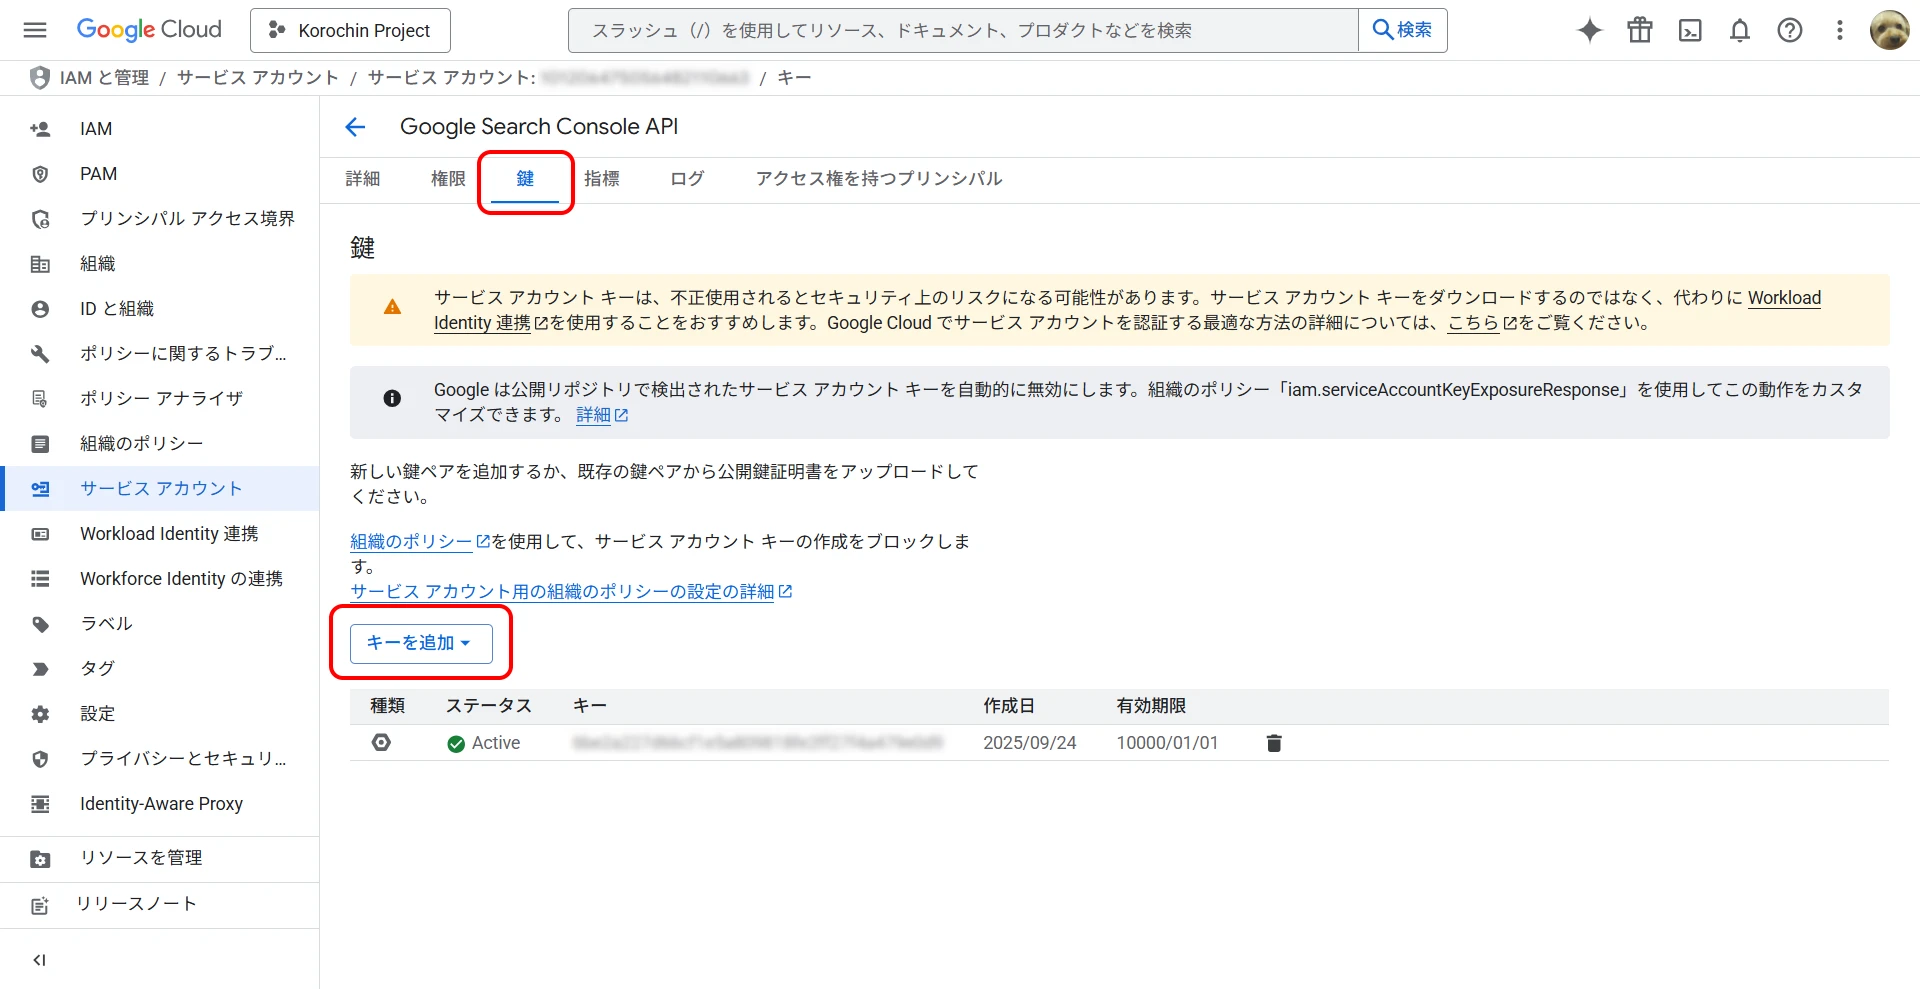
3キーの作成
作成したサービスアカウントの「鍵」タブの「キーを追加」をクリック(図3)し、キーのタイプとして JSON を選択してダウンロードします。JSON ファイルはプログラムからの API 呼び出しで使用します。この JSON ファイルには、API にアクセスするための認証情報が含まれているため、安全に保管してください。
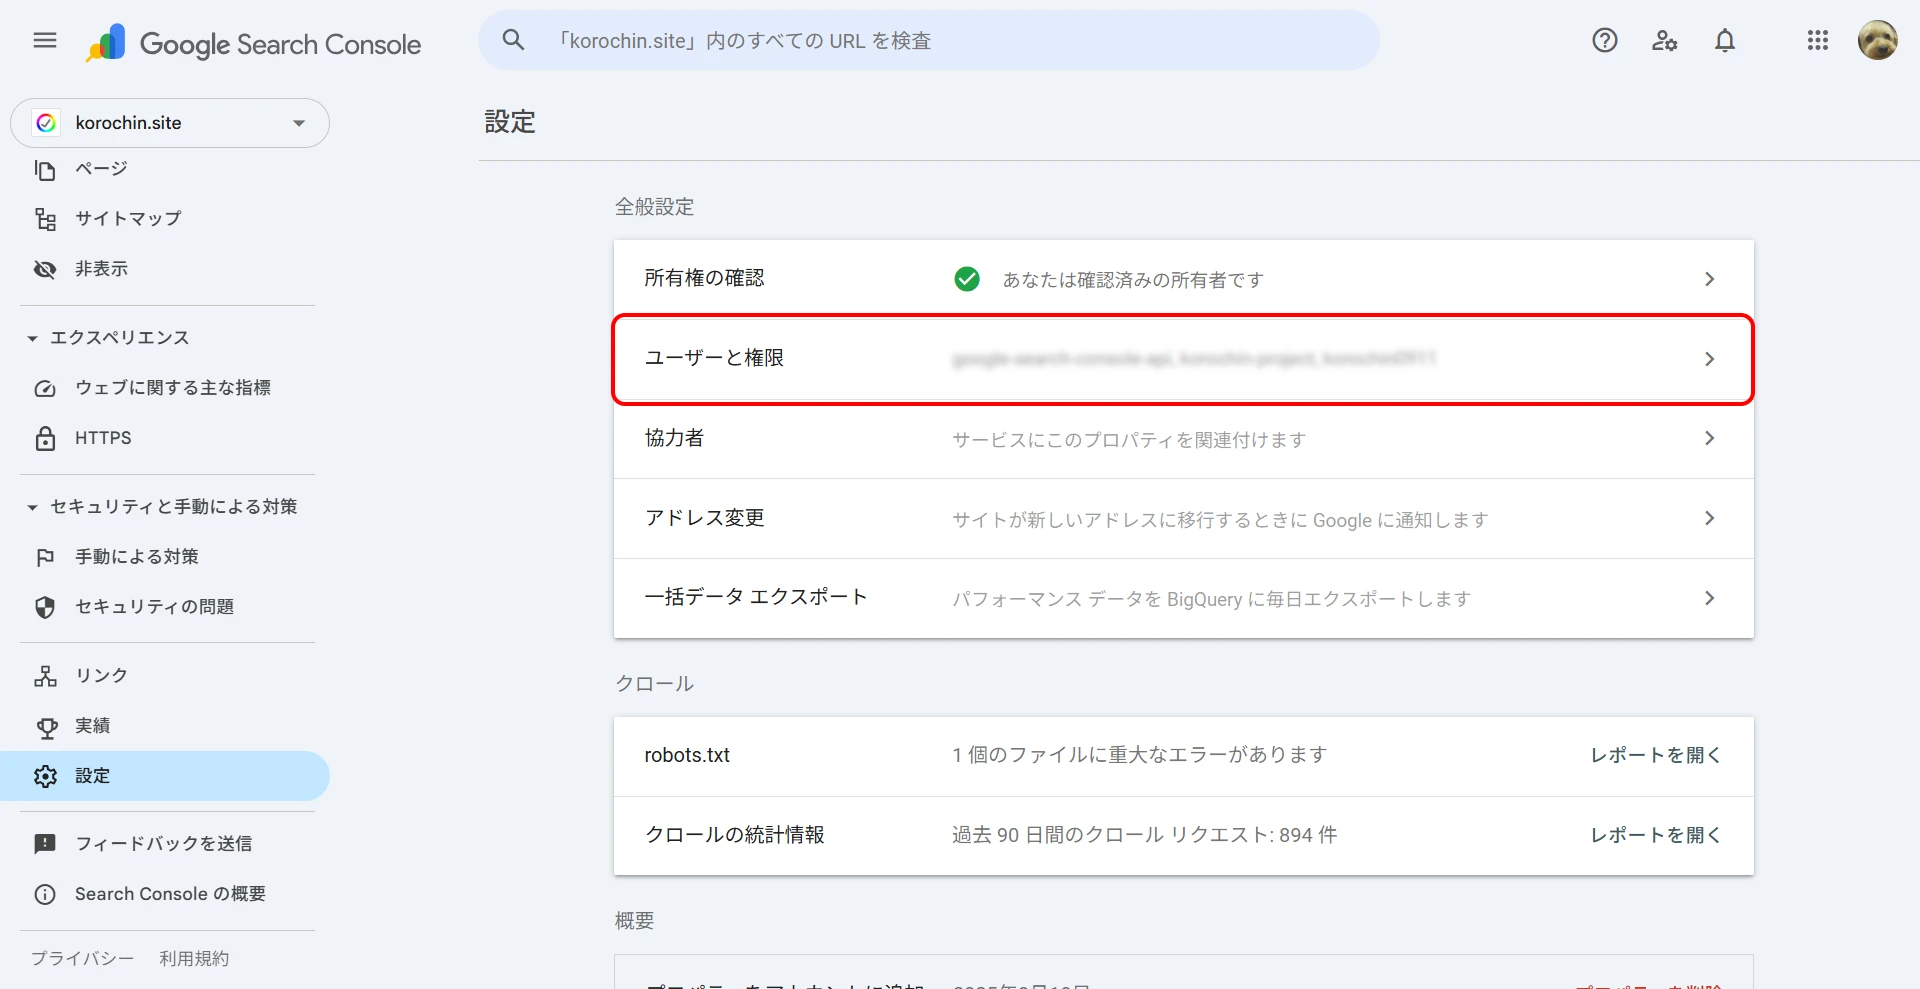
4Google Search Console にサービスアカウントを追加
次は Google Search Console にアクセスして、「2. サービスアカウントの作成」で作成したサービスアカウントを設定します。
設定 > ユーザーと権限 から「ユーザーを追加」をクリックして、「2. サービスアカウントの作成」で作成したサービスアカウントのメールアドレスを追加します。権限は「制限付き」で問題ありません。
プログラムから API 呼び出し
これで、プログラミング言語を使って API を呼び出す準備ができました。ここで使用する URL 検査 の API は POST リクエストを使用し、リクエストボディに JSON 形式で検査したい URL とサイト URL を指定します。
- APIエンドポイント:
https://searchconsole.googleapis.com/v1/urlInspection/index:inspect - JSON POST の例:
{
  "inspectionUrl": "https://www.example.com/mypage",
  "siteUrl": "https://www.example.com/",
  "languageCode": "en-US"
}
siteUrl の指定方法に注意が必要です。
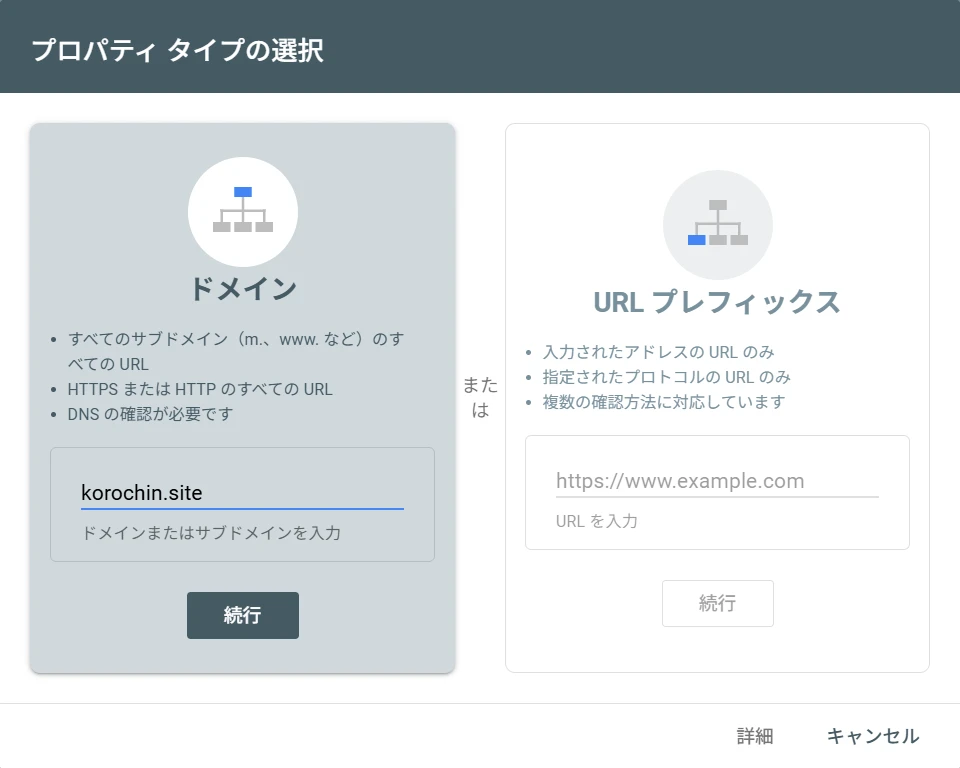
図5 のように Search Console のプロパティ追加時に「ドメイン」を指定している場合、siteUrl は sc-domain:ドメイン名 という形式で指定する必要があります。
上の例の場合、https://korochin.site を指定すると「You do not own this site」というエラーになります。
<HttpError 403 when requesting https://searchconsole.googleapis.com/v1/urlInspection/index:inspect?alt=json returned "You do not own this site, or the inspected URL is not part of this property.". Details: "You do not own this site, or the inspected URL is not part of this property.">
Python の場合
Python で Google API を扱うためのライブラリをインストールします。
pip install google-api-python-client google-auth-httplib2 google-auth-oauthlib
ダウンロードした認証情報の JSON ファイルを py ファイルと同じディレクトリに置きます。
ファイル名は search_console_credentials.json としました。
import json
import googleapiclient.discovery
import google.auth

CREDENTIALS_FILE = "search_console_credentials.json"

try:
    # 認証情報のロード
    credentials, _ = google.auth.load_credentials_from_file(
        CREDENTIALS_FILE, ["https://www.googleapis.com/auth/webmasters.readonly"]
    )

    # Google Search Console API サービスのビルド
    service = googleapiclient.discovery.build(
        "searchconsole", "v1", credentials=credentials
    )

    # リクエストボディの作成
    site_url = "sc-domain:korochin.site"
    inspection_url = "https://korochin.site/articles/visual-studio-2026-insiders"

    request_body = {
        "inspectionUrl": inspection_url,
        "siteUrl": site_url,
        "languageCode": "ja",
    }

    # API 呼び出し
    response = service.urlInspection().index().inspect(body=request_body).execute()
    print(json.dumps(response, indent=2))

except Exception as e:
    print(f"エラーが発生しました: {e}")
googleapiclient.discovery を使用せず、直接リクエストを送信する場合は以下のようなコードになります。
import json
import requests
import google.auth
from google.auth.transport.requests import Request

CREDENTIALS_FILE = 'search_console_credentials.json'

# 認証情報のロード
credentials, _ = google.auth.load_credentials_from_file(
    CREDENTIALS_FILE,
    scopes=['https://www.googleapis.com/auth/webmasters.readonly']
)

# 認証トークンのリフレッシュ
credentials.refresh(Request())

# API エンドポイントとリクエストヘッダーの設定
api_url = 'https://searchconsole.googleapis.com/v1/urlInspection/index:inspect'
headers = {
    'Content-Type': 'application/json',
    'Authorization': f'Bearer {credentials.token}'
}

# リクエストボディの作成
site_url = 'sc-domain:korochin.site'
inspection_url = 'https://korochin.site/articles/visual-studio-2026-insiders'

request_body = {
    'inspectionUrl': inspection_url,
    'siteUrl': site_url,
    'languageCode': 'ja'
}

# HTTP POST リクエストの実行
try:
    response = requests.post(api_url, headers=headers, data=json.dumps(request_body))
    response.raise_for_status()  # ステータスコードが200番台以外の場合、例外を発生させる
    print(json.dumps(response.json(), indent=2))

except requests.exceptions.RequestException as e:
    print(f"エラーが発生しました: {e}")
C# の場合
Python の場合と同様に、認証情報のファイルはアプリケーションの実行形式ファイルと同じディレクトリに置きます。
2つのパッケージを使用します。
dotnet add package Google.Apis.Auth
dotnet add package Google.Apis.SearchConsole.v1
または
Install-Package Google.Apis.Auth
Install-Package Google.Apis.SearchConsole.v1
using Google.Apis.Auth.OAuth2;
using Google.Apis.SearchConsole.v1;
using Google.Apis.SearchConsole.v1.Data;
using Google.Apis.Services;

// 認証情報のロード
var credentialsPath = "search_console_credentials.json";
using var stream = new FileStream(credentialsPath, FileMode.Open, FileAccess.Read);
var credential = GoogleCredential.FromStream(stream)
    .CreateScoped([SearchConsoleService.Scope.WebmastersReadonly]);

// Search Console API サービスを生成
using var service = new SearchConsoleService(new BaseClientService.Initializer
{
    HttpClientInitializer = credential,
});

// リクエストボディを作成
var siteUrl = "sc-domain:korochin.site";
var inspectionUrl = "https://korochin.site/articles/visual-studio-2026-insiders";

var request = new InspectUrlIndexRequest
{
    InspectionUrl = inspectionUrl,
    SiteUrl = siteUrl,
    LanguageCode = "ja"
};

try
{
    // API 呼び出し
    var response = await service.UrlInspection.Index.Inspect(request).ExecuteAsync();
    Console.WriteLine(response.InspectionResult.IndexStatusResult.IndexingState);
}
catch (Google.GoogleApiException ex)
{
    Console.WriteLine($"エラーが発生しました: {ex.Message}");
}
API のレスポンスデータ
レスポンスデータは以下のような形式になっています。
詳細な仕様については参考資料の公式ドキュメントを参照してください。
{
  "inspectionResult": {
    "inspectionResultLink": "https://search.google.com/search-console/inspect?resource_id=sc-domain:korochin.site&id=hogehogeA&utm_medium=link&utm_source=api",
    "indexStatusResult": {
      "verdict": "PASS",
      "coverageState": "送信して登録されました",
      "robotsTxtState": "ALLOWED",
      "indexingState": "INDEXING_ALLOWED",
      "lastCrawlTime": "2025-09-24T04:12:40Z",
      "pageFetchState": "SUCCESSFUL",
      "googleCanonical": "https://korochin.site/articles/visual-studio-2026-insiders",
      "crawledAs": "MOBILE"
    },
    "mobileUsabilityResult": {
      "verdict": "VERDICT_UNSPECIFIED"
    }
  }
}
インデックスの登録状況は indexingState に設定されます。各ステータスの意味は以下の表になります。INDEXING_ALLOWED がインデックス登録済みを表します。
| ステータス名 | 説明 |
|---|---|
| INDEXING_STATE_UNSPECIFIED | インデックス登録ステータスが不明です。 |
| INDEXING_ALLOWED | インデックス登録が許可されています。 |
| BLOCKED_BY_META_TAG | インデックス登録は許可されていません。robots メタタグで「noindex」が検出されました。 |
| BLOCKED_BY_HTTP_HEADER | インデックス登録は許可されていません。X-Robots-Tag HTTP ヘッダーで「noindex」が検出されました。 |
| BLOCKED_BY_ROBOTS_TXT | 予約済み。現在は使用されていません。 |