Azure Cosmos DB backup
Table of Contents
-
- 3.1. Download
- 3.2. Editing the Configuration File (migrationsettings.json)
- 3.3. Execution
- 3.4. Note
Introduction
Cosmos DB has two backup policy modes:
- Periodic (default: periodic backup)
- Continuous (continuous backup)
You can check which setting is enabled under Settings > Backup & Restore (Figure 1).
Figure 1. Confirming backup mode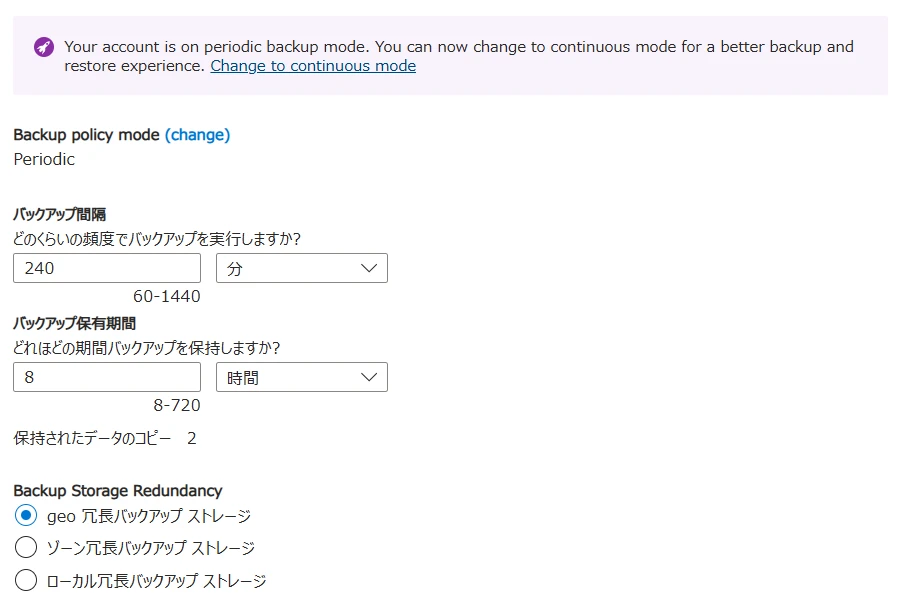
The default settings are as follows:
- Backup mode is
Periodic - Automatic backup every 4 hours (240 minutes)
- Maximum of 2 backups retained
- Free of charge (if you retain more than 2 backups, charges apply)
With Periodic mode, you need to contact Microsoft support to restore data.
If you accidentally delete a database or container, you can submit a support ticket or contact Azure Support to restore data from automatic online backups.
If you want to perform restore operations yourself, you must select Continuous mode, but this is a paid feature.
Therefore, I investigated methods to export data without using Azure Cosmos DB's native backup feature.
Azure Portal
While you can browse and edit Cosmos DB data using the Azure portal's Data Explorer, there doesn't seem to be an export function.
You can import JSON data using Upload Item, so restoration is possible from here.
Azure Cosmos DB Desktop Data Migration Tool
- An open-source command-line tool
- Can perform both export and import
- Export/import destinations are not limited to JSON; CSV, Azure Blob Storage, SQL Server, etc., are also supported.
- Input/output specifications are defined in a configuration file.
This tool can perform exports and imports.
1Download
Download the latest version from the GitHub Releases (Figure 2).
Figure 2. Downloading the Data Migration Tool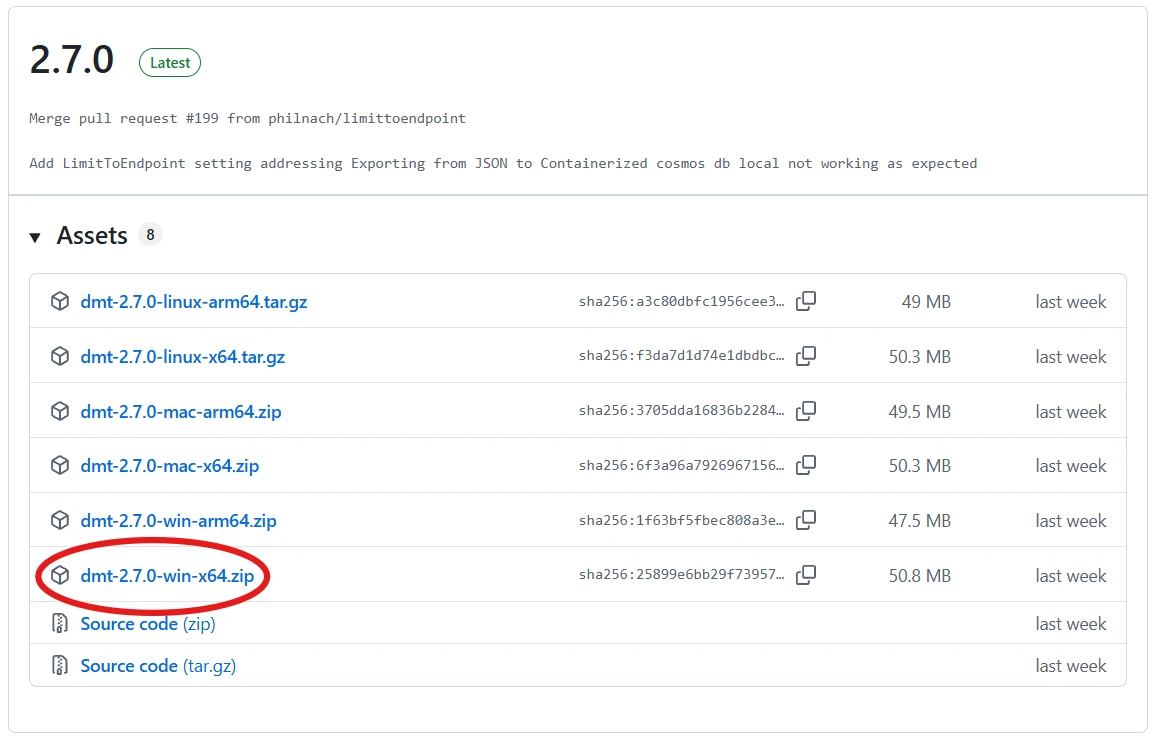
2Editing the Configuration File (migrationsettings.json)
The configuration file (migrationsettings.json) is located in the unzipped folder.
You will write the input/output settings here.
Data is output in the direction of Source ➜ Sink.
Below is an example of outputting data from Cosmos DB (Cosmos-NoSql) to a local PC's JSON file.
{
    "Source": "Cosmos-NoSql",
    "Sink": "JSON",
    "SourceSettings":
    {
        "ConnectionString": "AccountEndpoint=https://<Cosmos DB account name>.documents.azure.com:443/;AccountKey=<account key>;",
        "Database":"<database name>",
        "Container":"<container name>",
        "IncludeMetadataFields": true
    },
    "SinkSettings":
    {
        "FilePath": "output.json",
        "Indented": true
    }
}
3Execution
dmt.exe
output.json will be generated in the current directory.
For other patterns, such as importing from JSON to Cosmos DB, please refer to Example migrationsettings.json Files.
Note
Cosmos DB is billed by Request Unit (RU), so you will be charged for export requests. However, downloading to a local PC does not incur outbound transfer (transfer to the internet) fees.
Azure Data Factory
You can download data using Azure Data Factory with the following steps:
- Create a linked service
- Create a dataset
- Create and execute a pipeline (copy activity)
No charges are incurred when creating Azure Data Factory, linked services, datasets, or pipelines. Charges apply during pipeline execution based on the following units:
- Copy activity: Per execution time
- Cosmos DB: Per Request Unit (RU)
- Blob Storage: Per write capacity + transaction
If cross-region data transfer occurs, charges will also apply based on data volume, so it is more cost-effective to place Cosmos DB and Blob Storage in the same region.
Let's look at the steps to execute a pipeline.
1Create an Azure Data Factory (ADF)
From the portal, select Data Factory (V2) (Figure 3).
Figure 3. Select Data Factory (V2)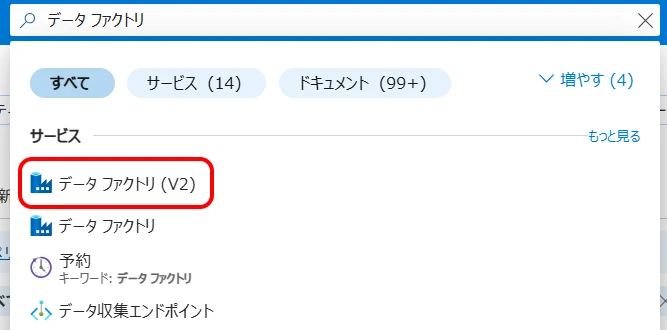
Click the "Create" button to proceed to the "Create data factory" screen (Figure 4).
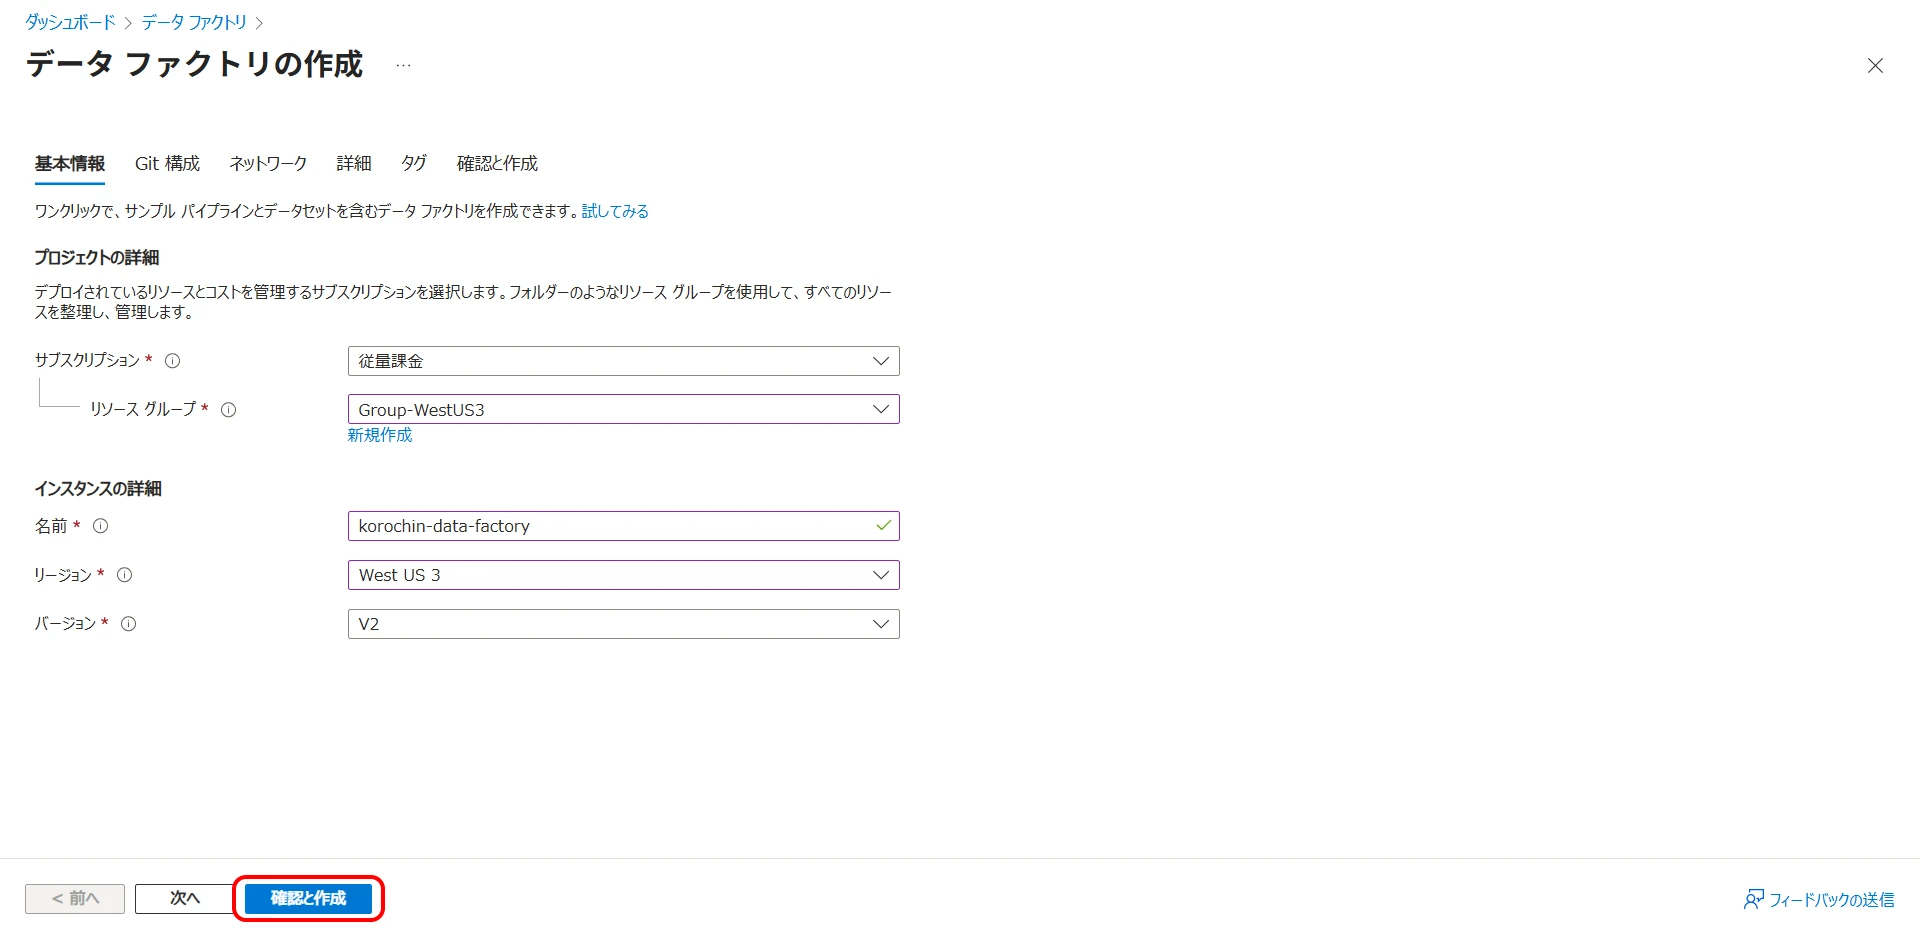
- Resource group
- Name
- Region
Select and enter each of these. Choose "V2" for the version and click "Review + create" to create the data factory.
2Create a Cosmos DB Linked Service
From the created data factory, click "Launch studio" (Figure 5).
Figure 5. Click "Launch studio"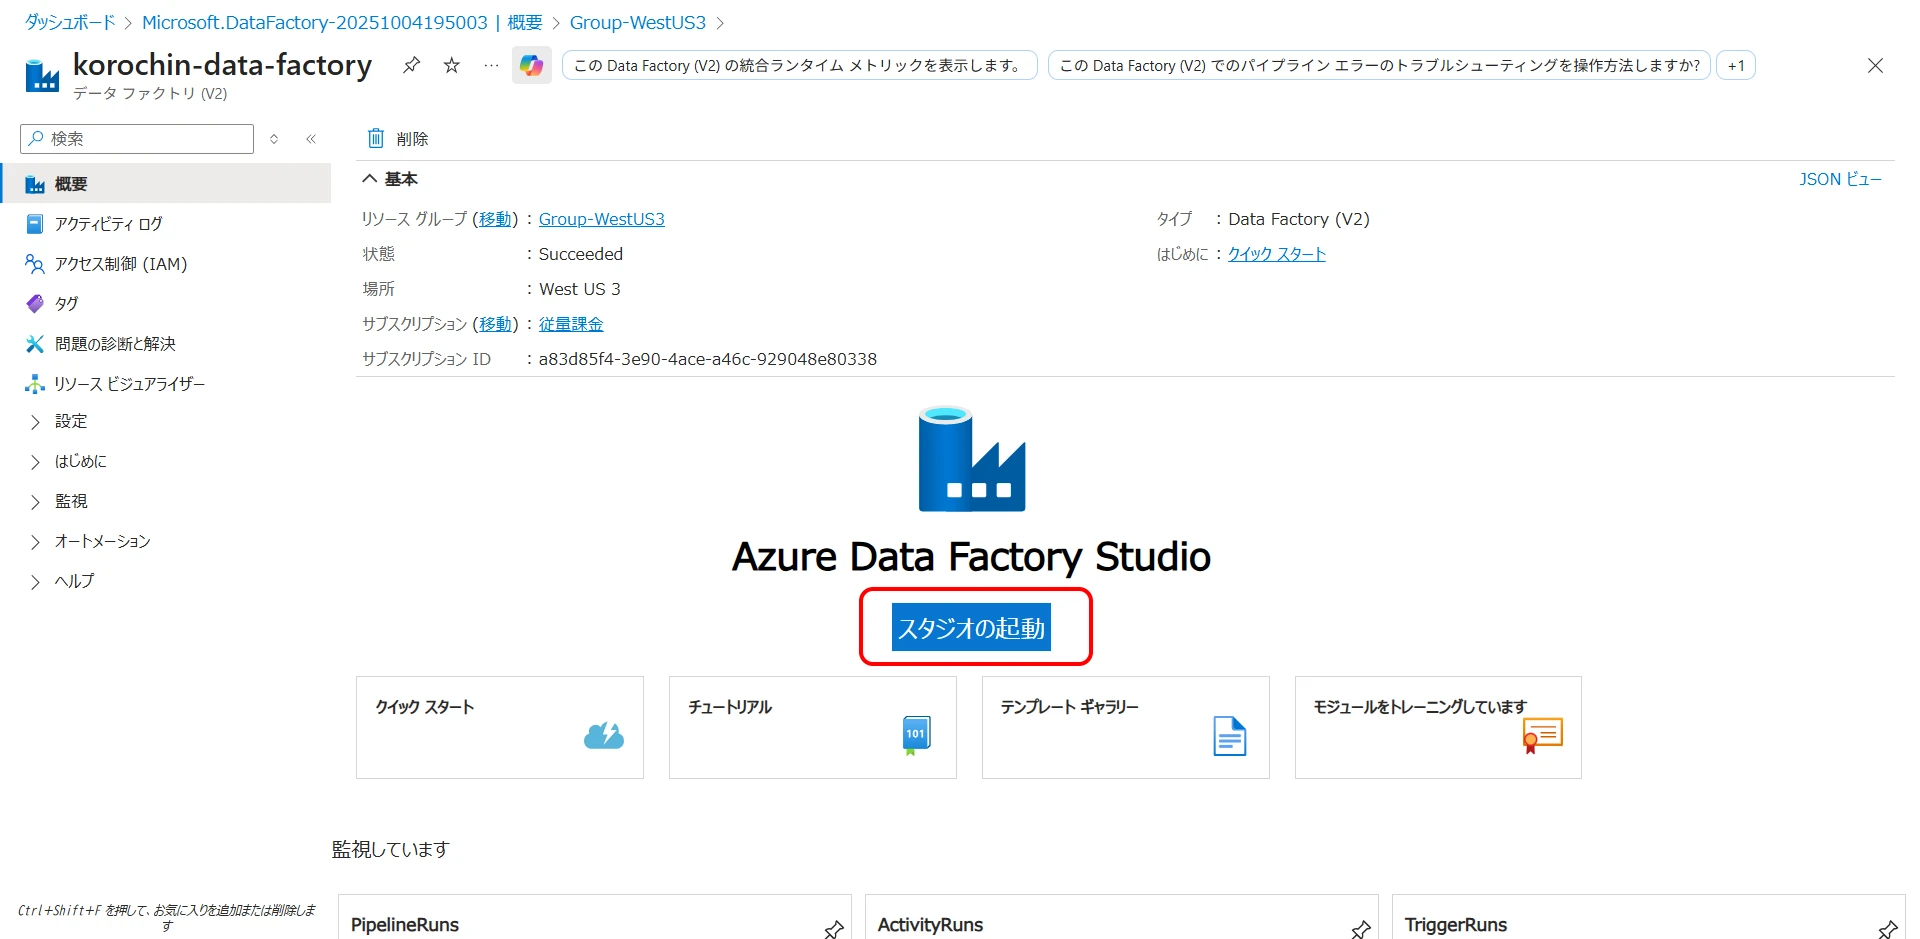
Click Manage > Linked services > New (Figure 6).
Figure 6. Create a linked service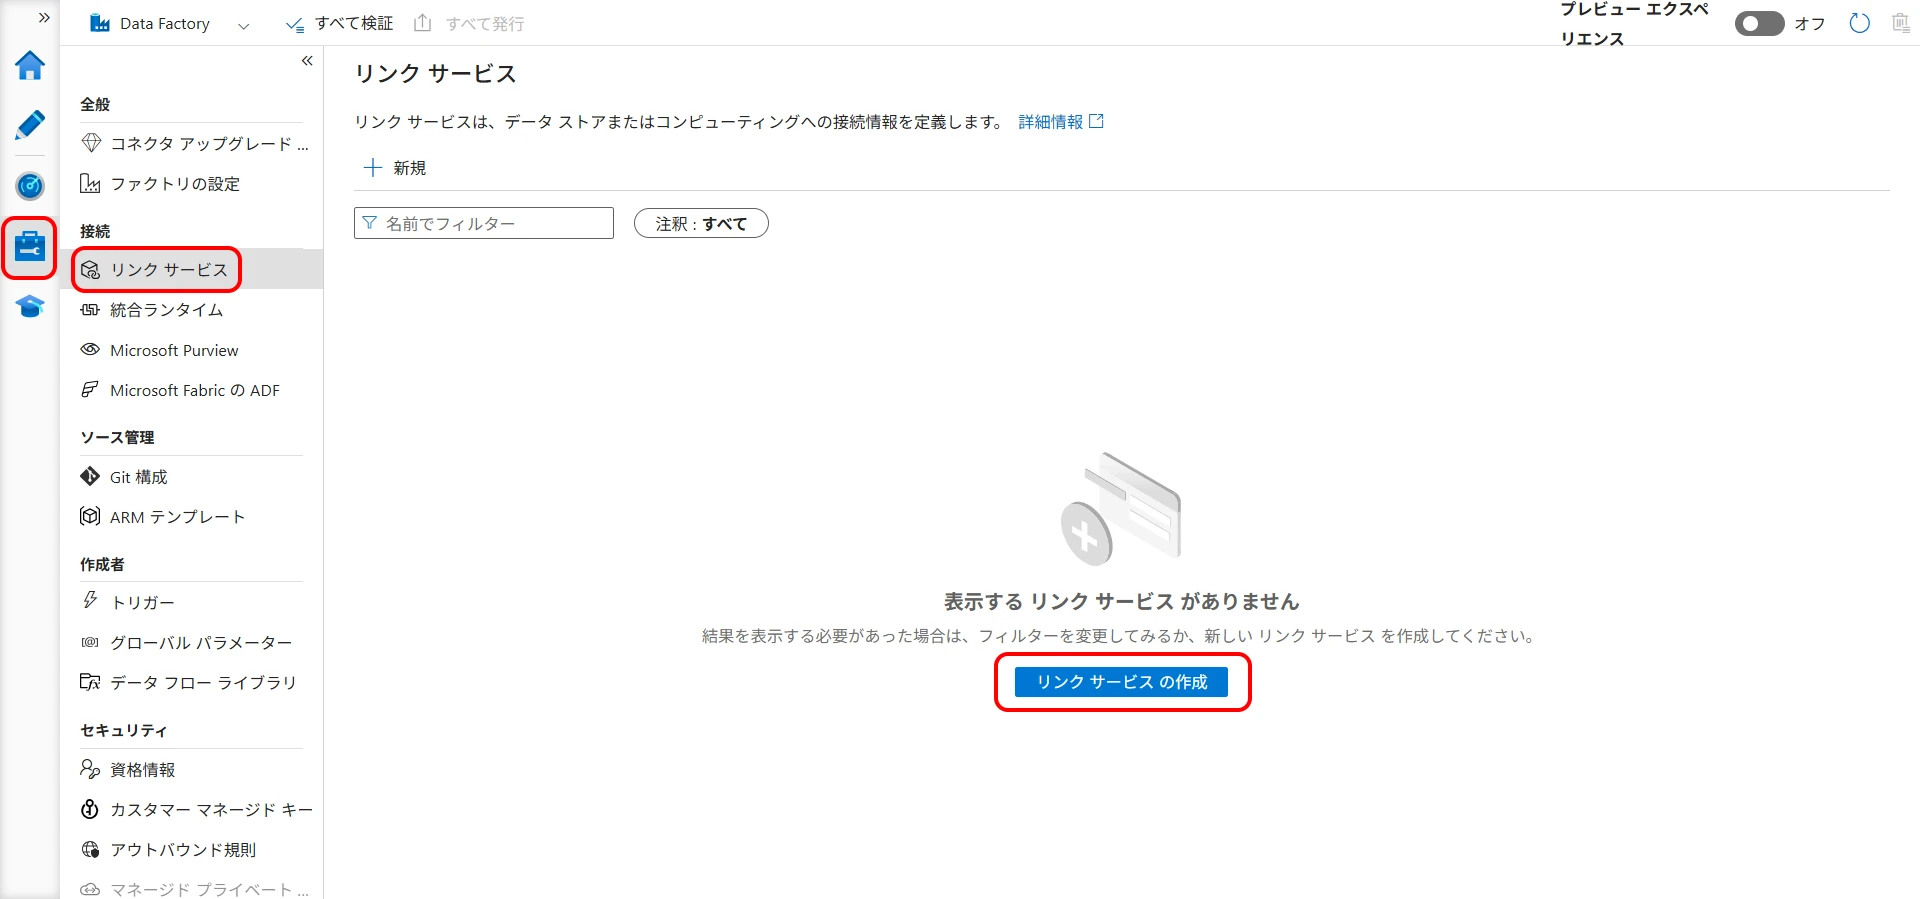
Select Azure Cosmos DB for NoSQL and click "Continue" (Figure 7).
Figure 7. Select Azure Cosmos DB for NoSQL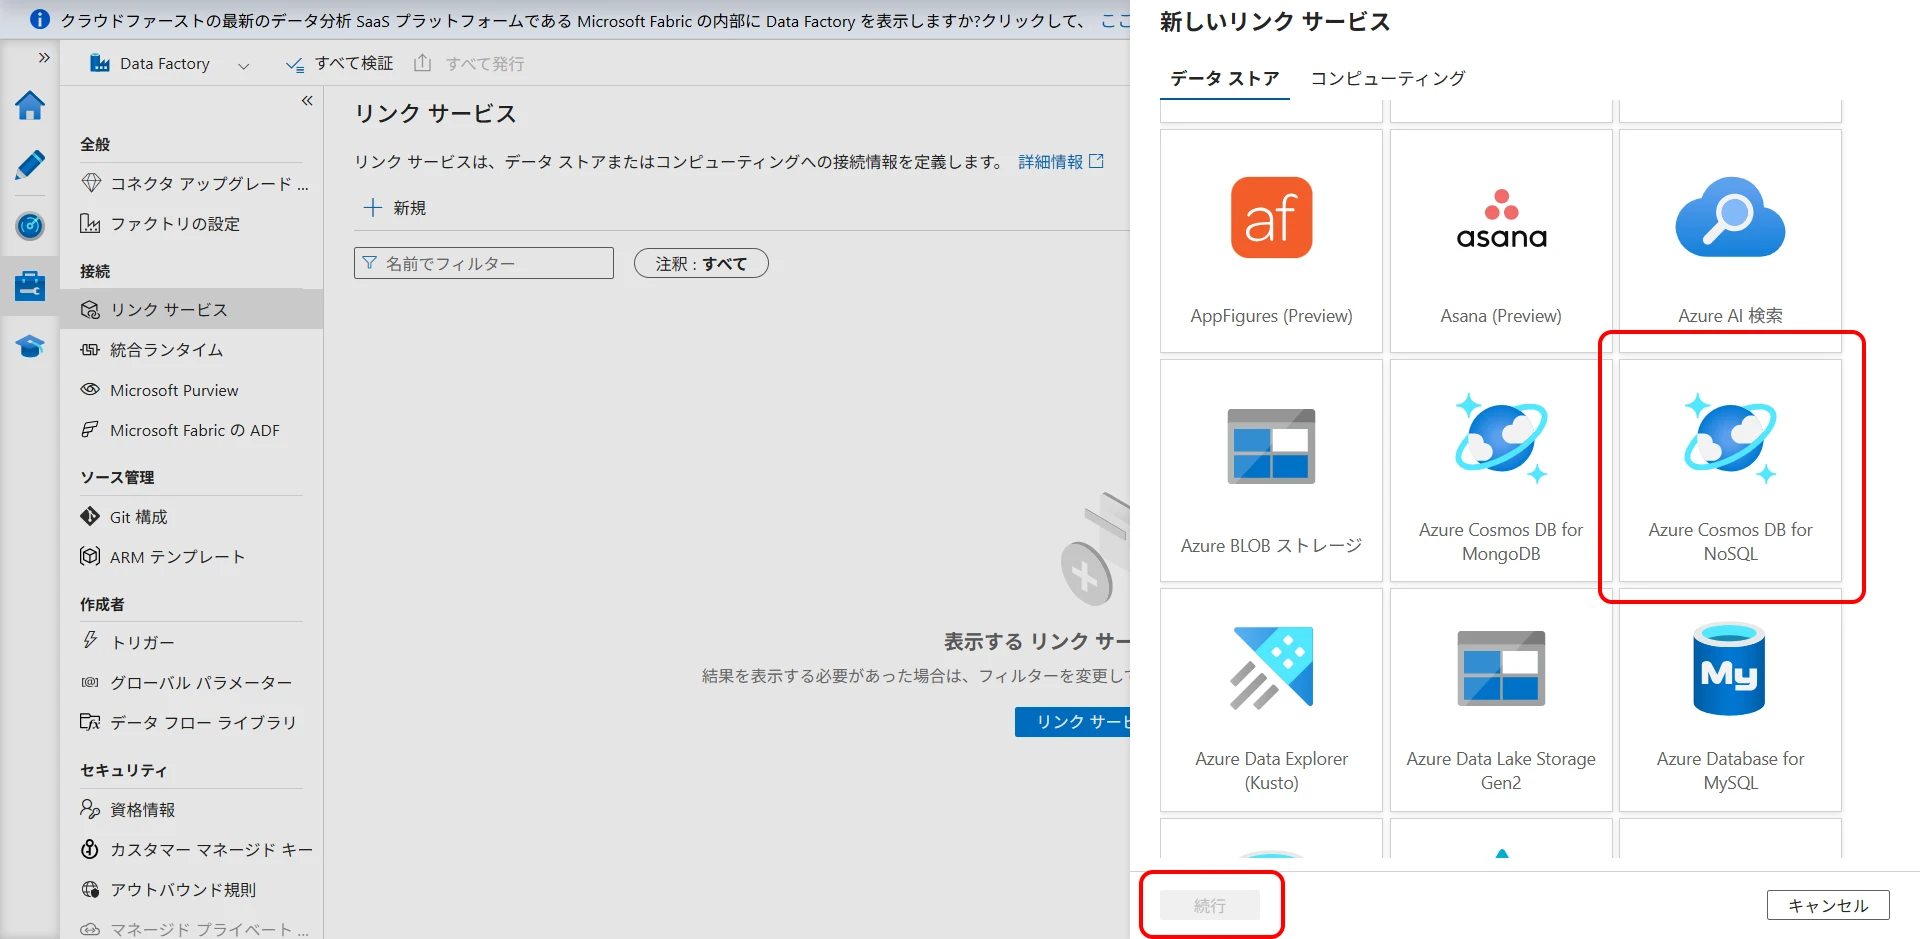
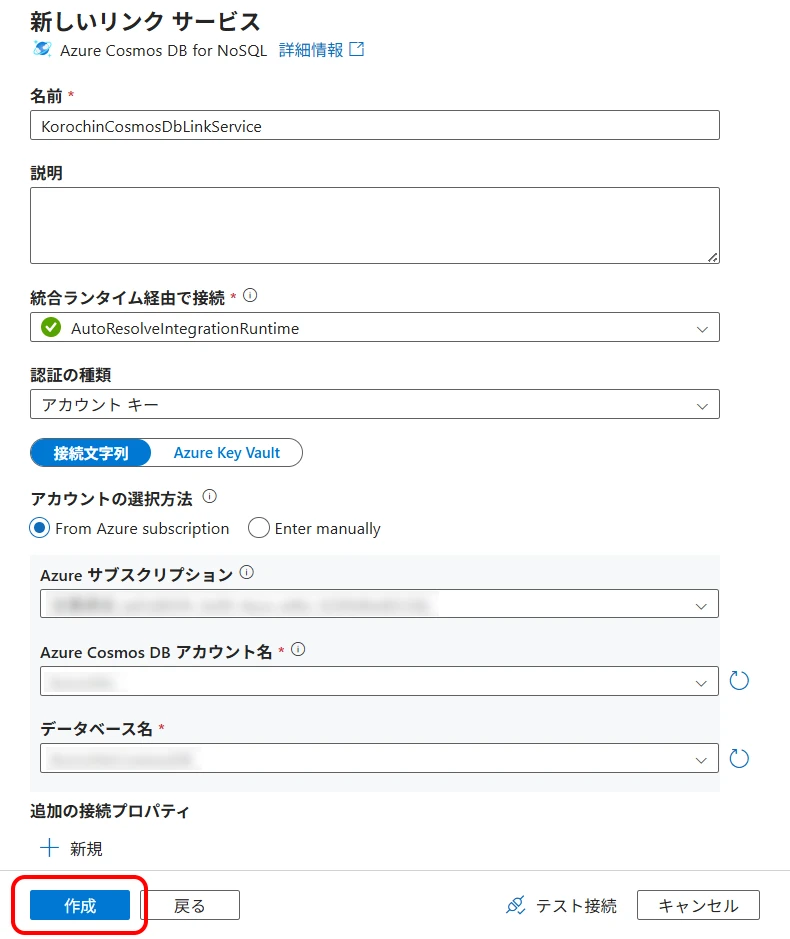
Give a desired identifier name, select the Cosmos DB connection information, and click "Create" (Figure 8).
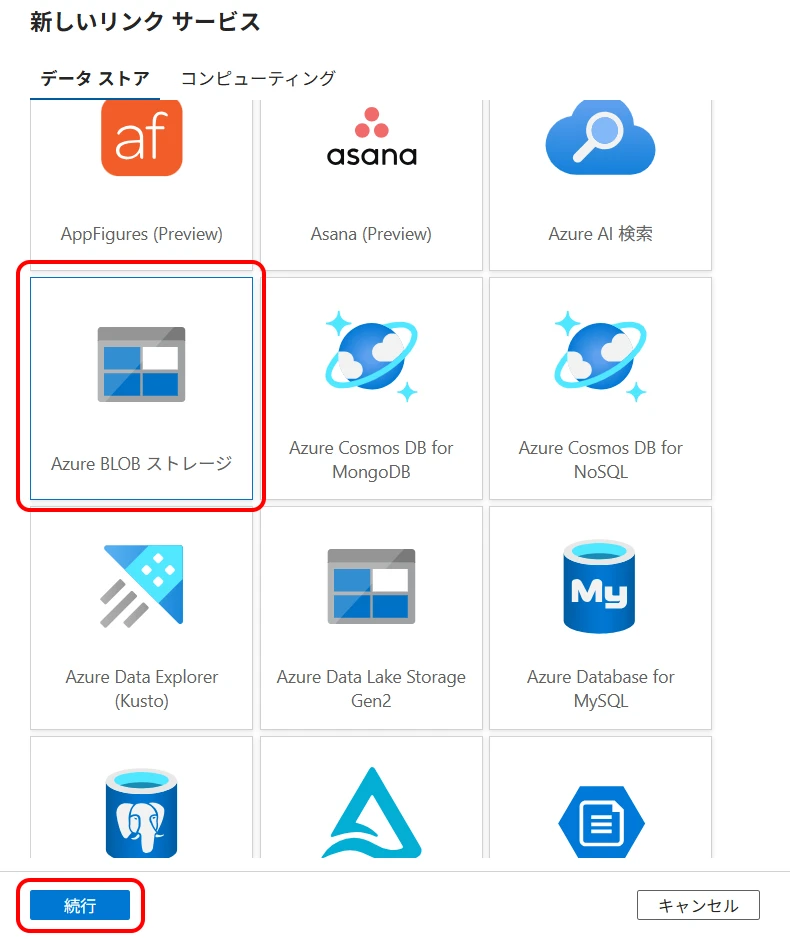
3Create a Blob Storage Linked Service
Similar to Cosmos DB, create a new linked service > select "Azure Blob Storage" > click "Continue" (Figure 9).
Give a desired identifier name, select the Blob Storage connection information, and click "Create" (Figure 10).
Figure 10. Create new linked service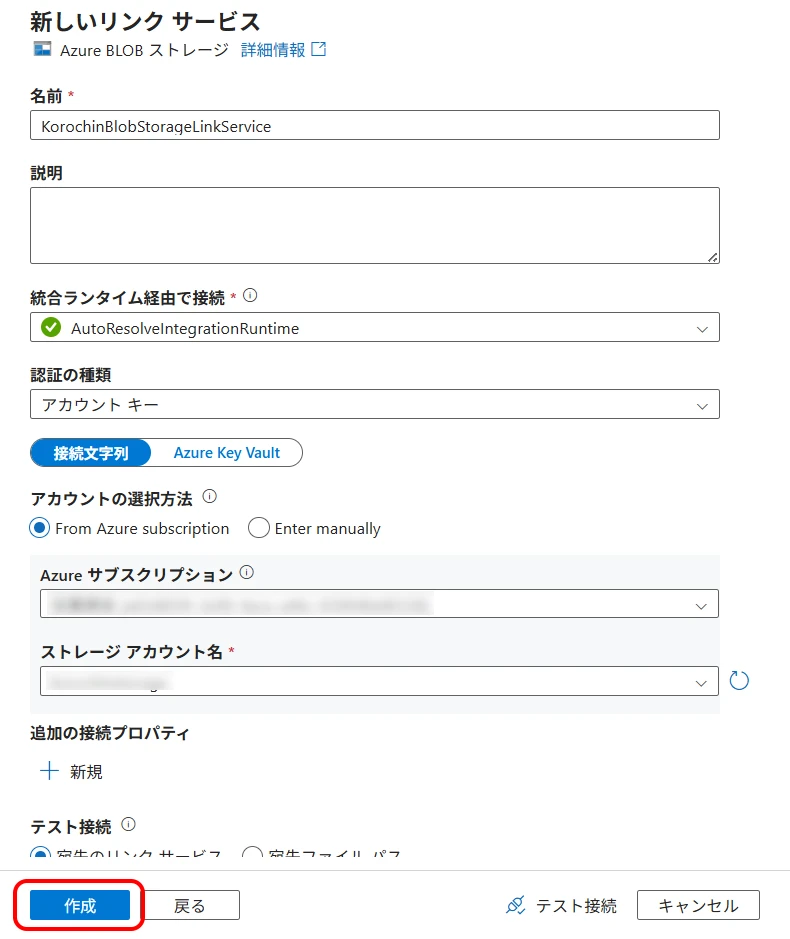
4Create a Cosmos DB Dataset
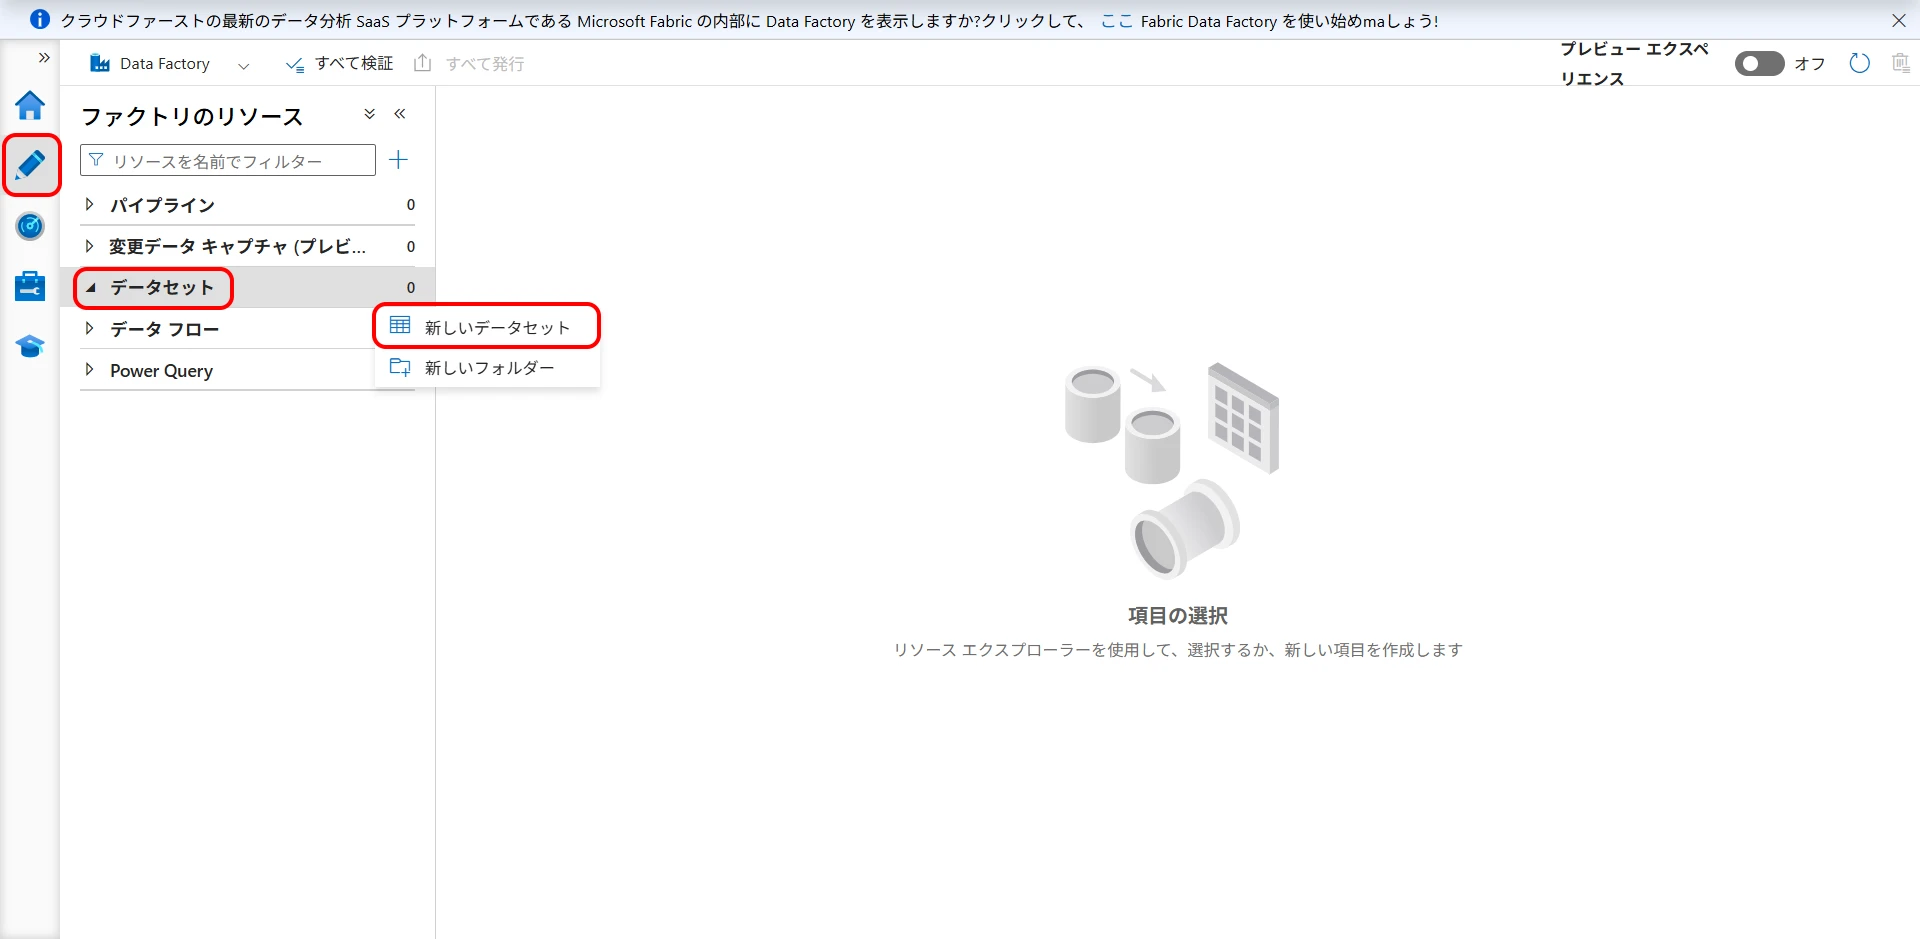
Next, create a Cosmos DB dataset.
Select Author (pencil icon) > Datasets > New dataset (Figure 11).
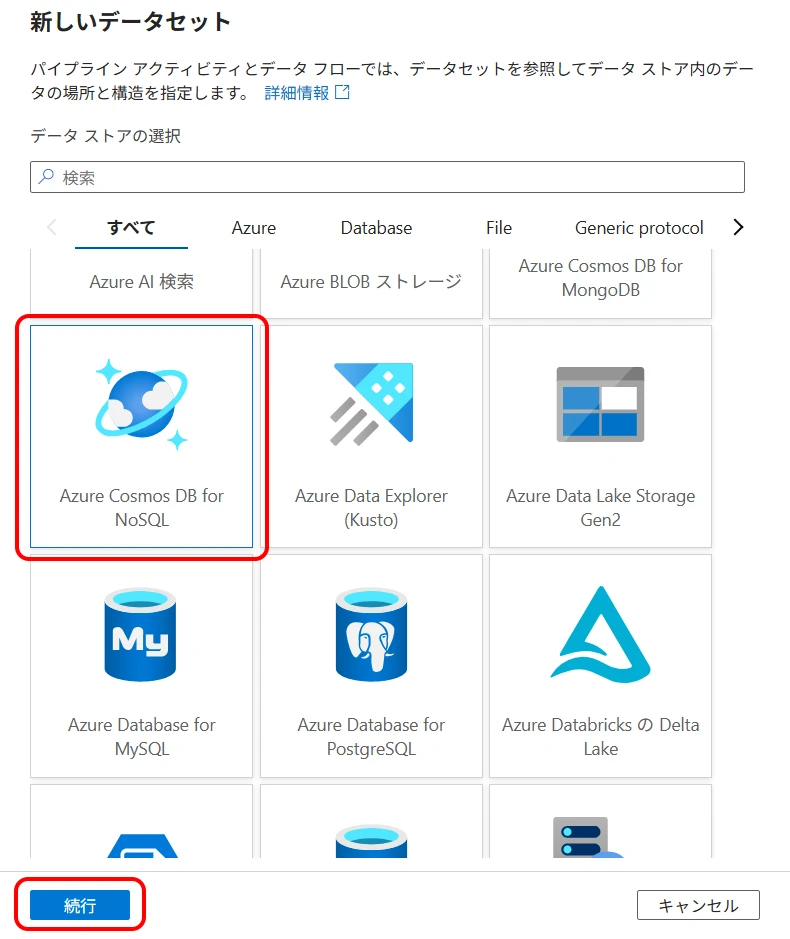
Select "Azure Cosmos DB for NoSQL" and click "Continue" (Figure 12).
Select the Cosmos DB linked service created in step 2 for the linked service, and select the container to be the source (Figure 13).
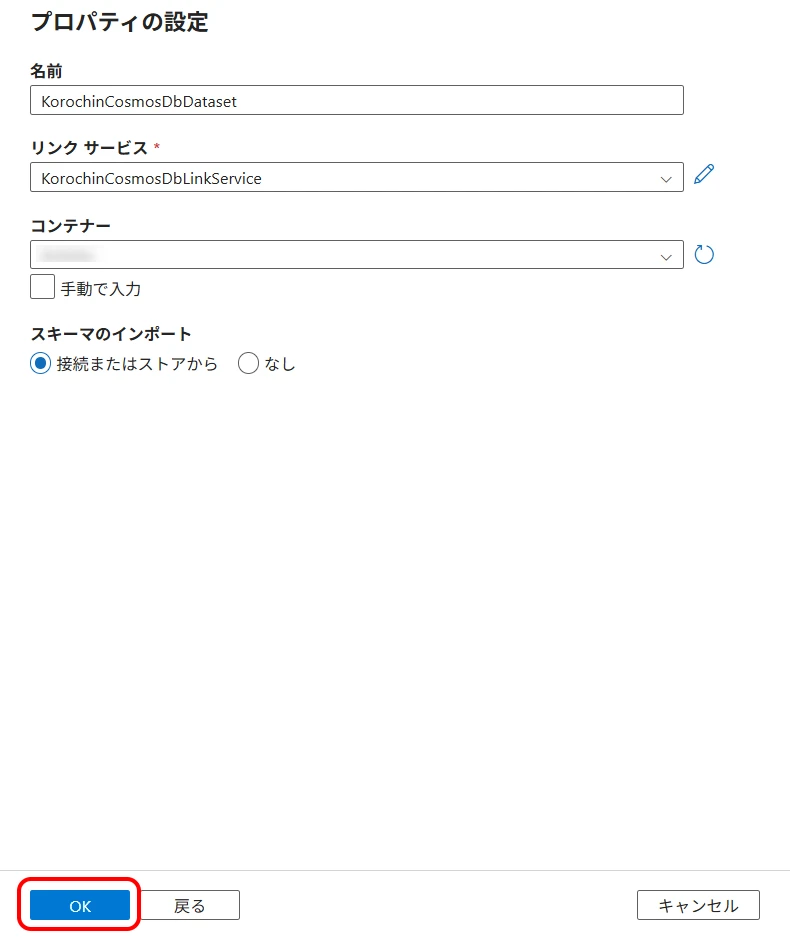
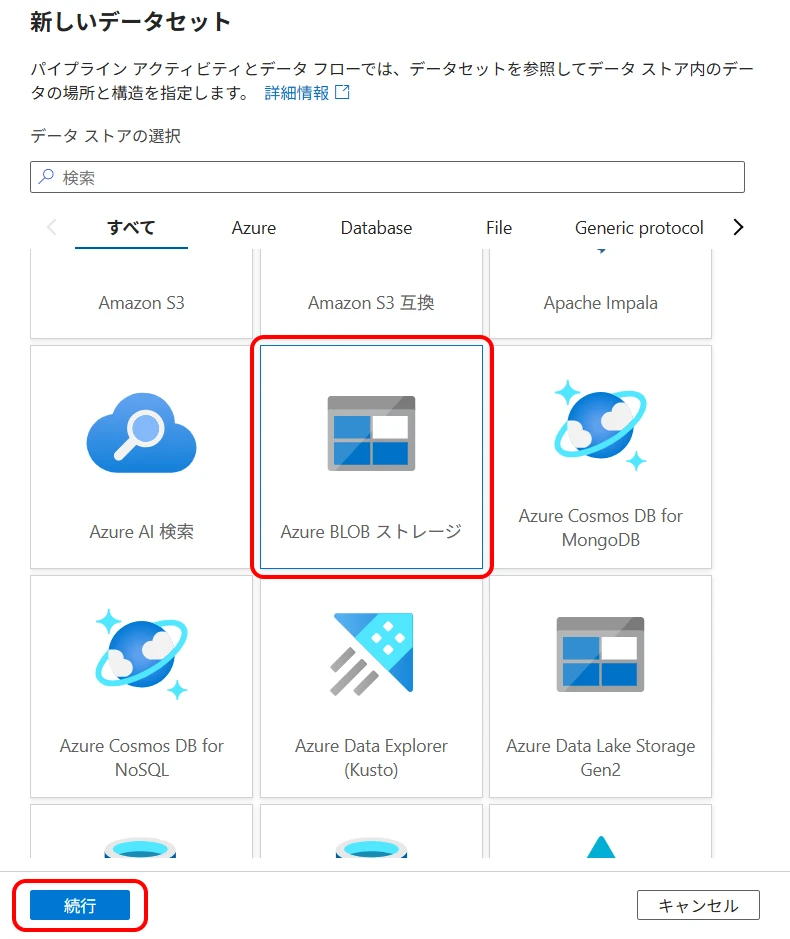
5Create a Blob Storage Dataset
Similar to Cosmos DB, create a Blob Storage dataset.
Select Author (pencil icon) > Datasets > New dataset > select "Azure Blob Storage" and click "Continue" (Figure 14).
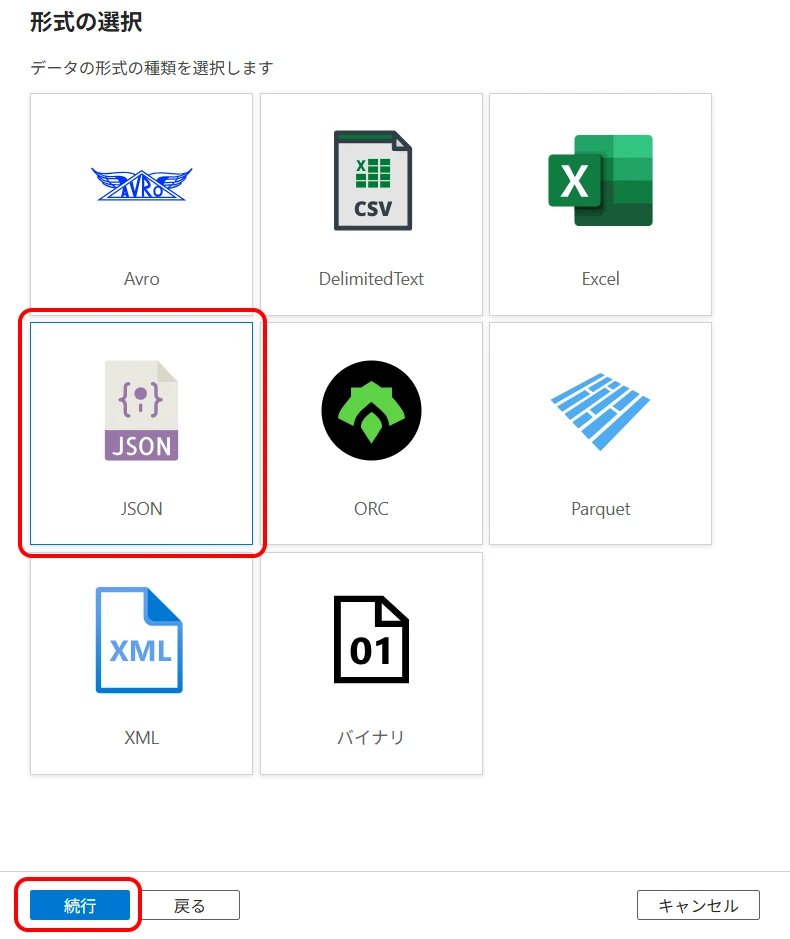
Select "JSON" and click "Continue" (Figure 15).
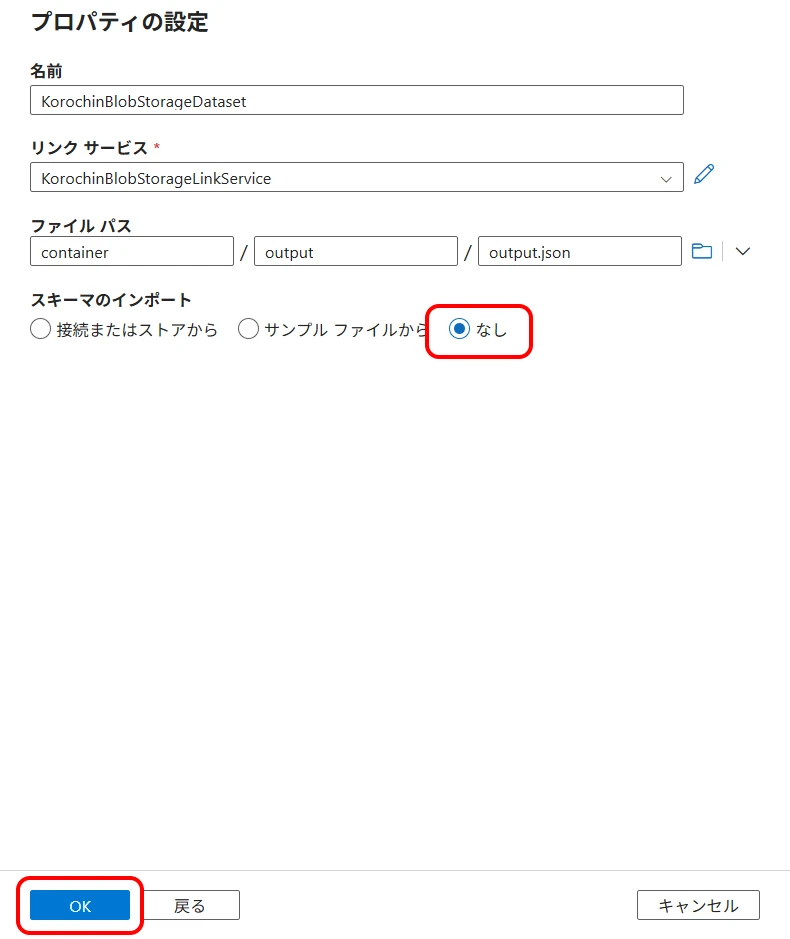
- Linked service Select the created Blob Storage linked service.
- File path This will be the output file path.
- Import schema Select "None".
Click "OK" (Figure 16).
6Create a Pipeline
Create a pipeline to copy data from Cosmos DB to Blob Storage.
Select Author > Pipelines > New pipeline (Figure 17).
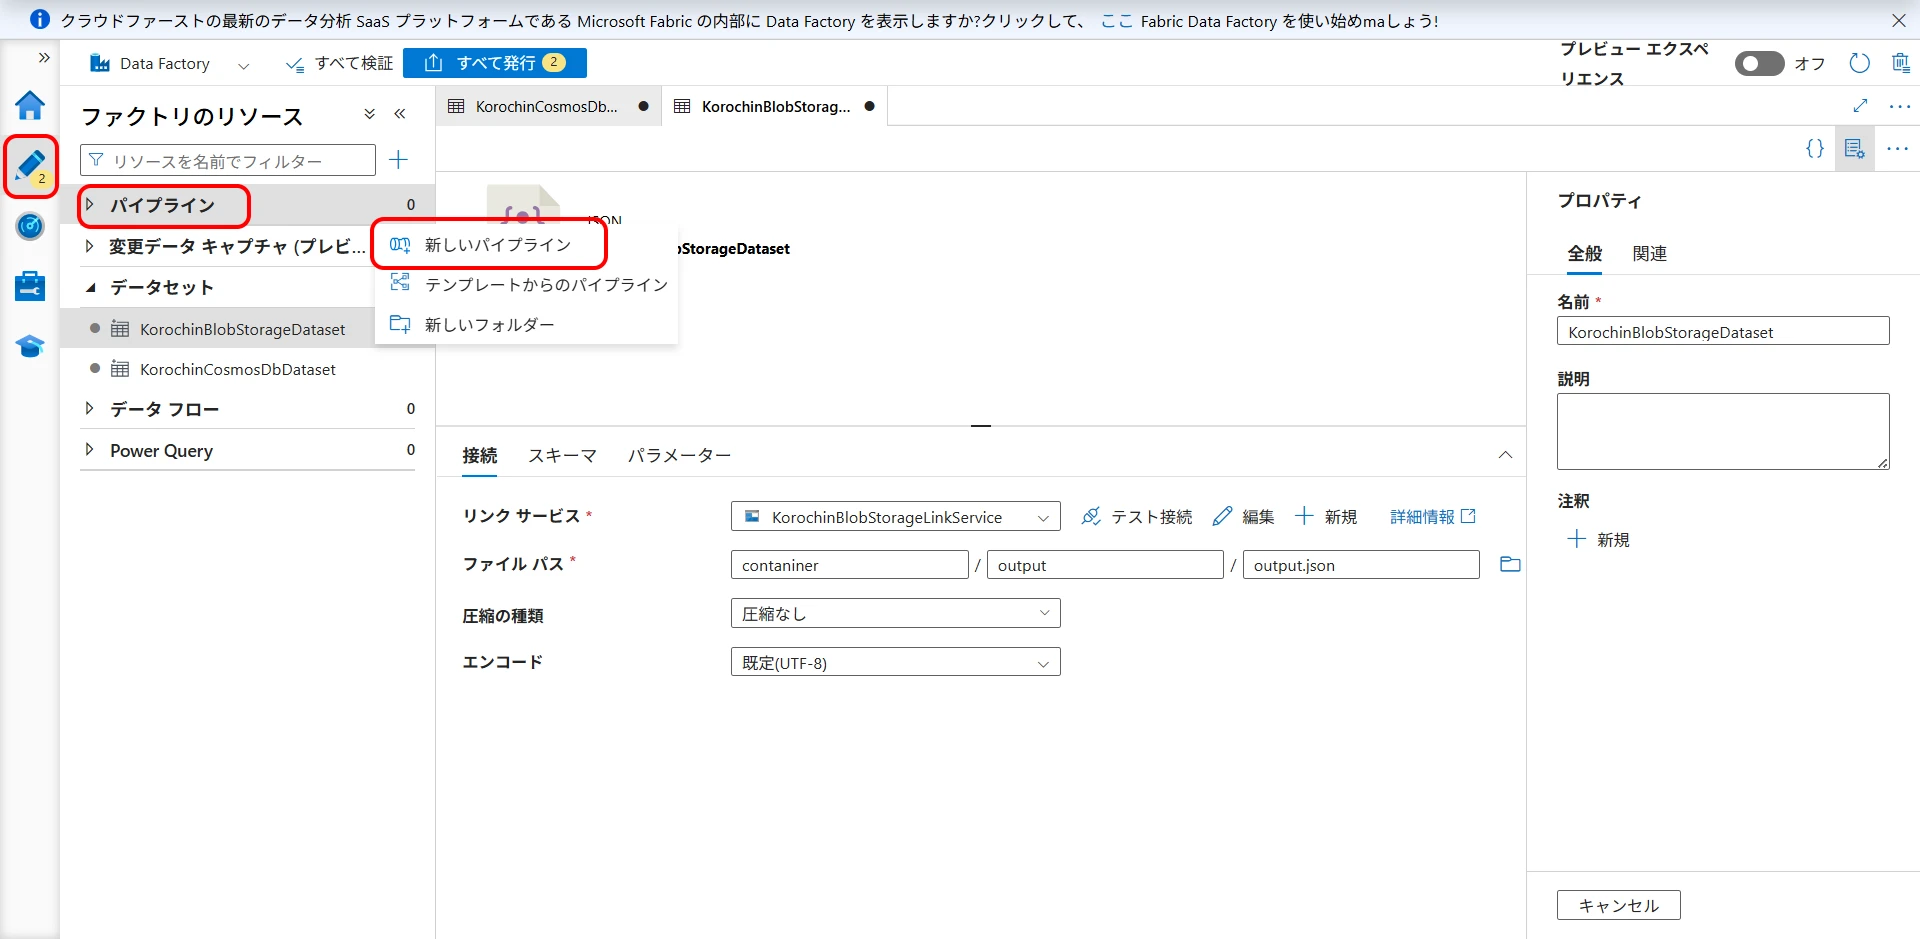
Drag "Copy data" from Activities (Figure 18).
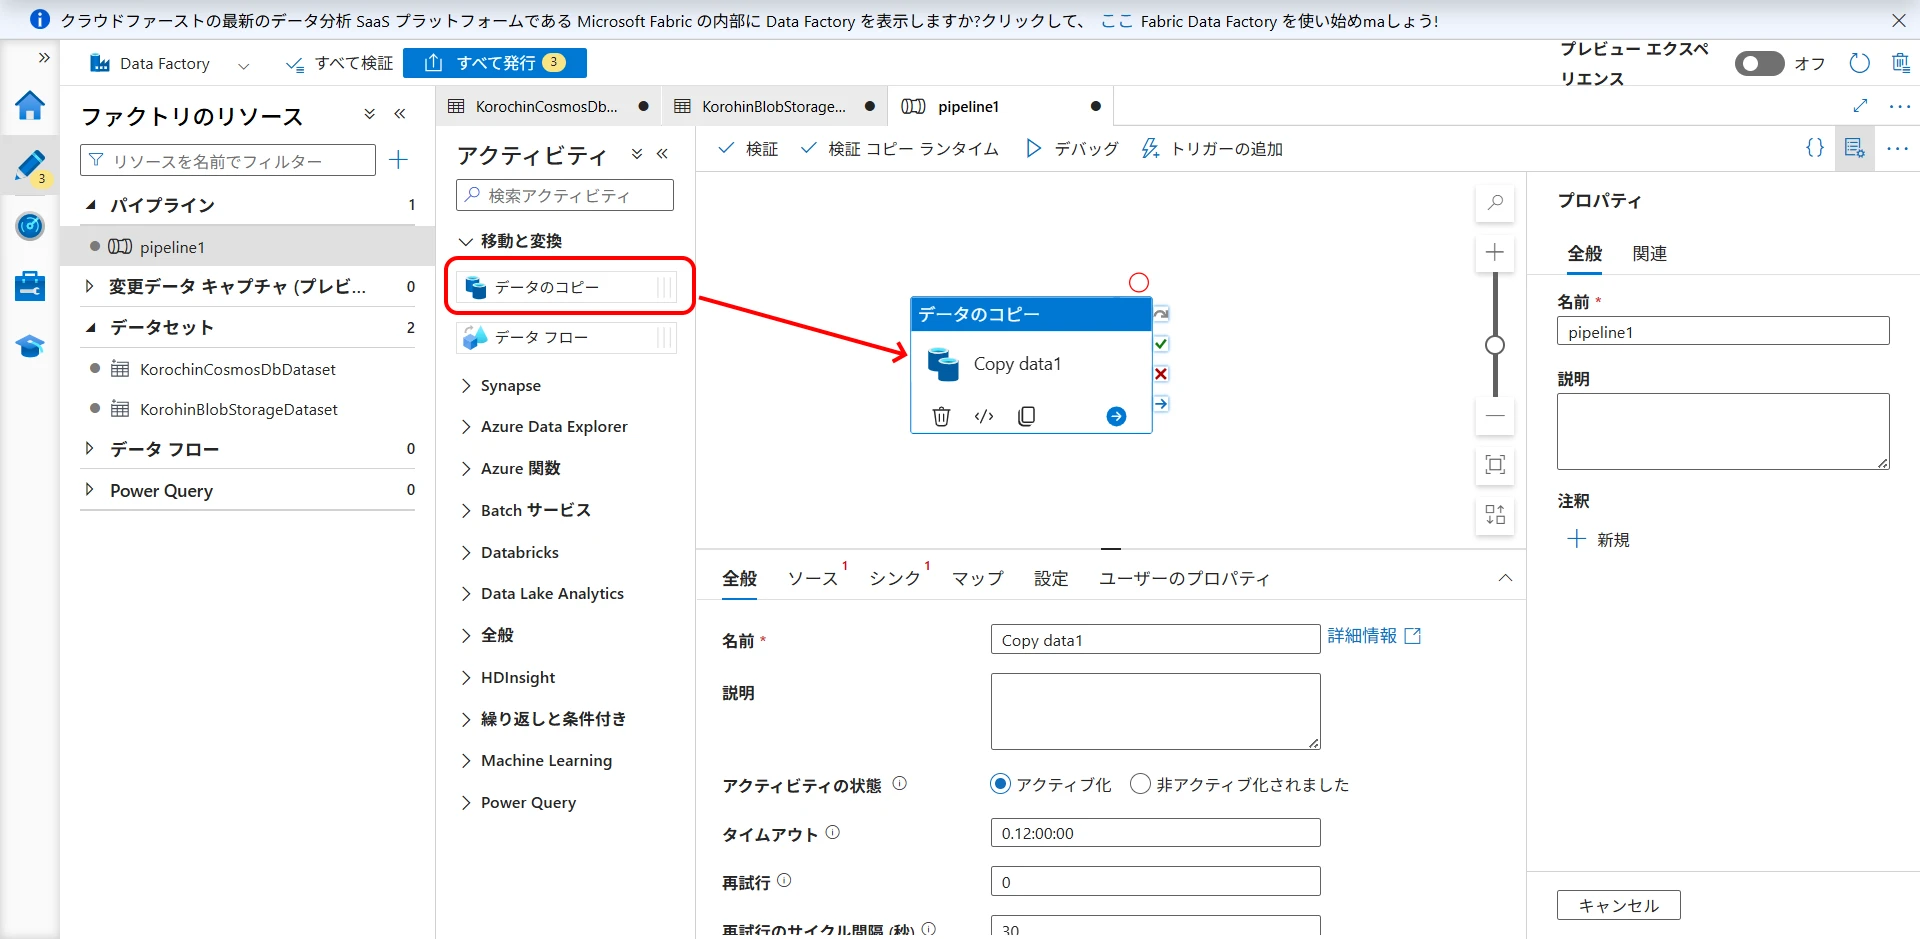
On the "Source" tab, select the Cosmos DB dataset (Figure 19).
Figure 19. Select Cosmos DB dataset as source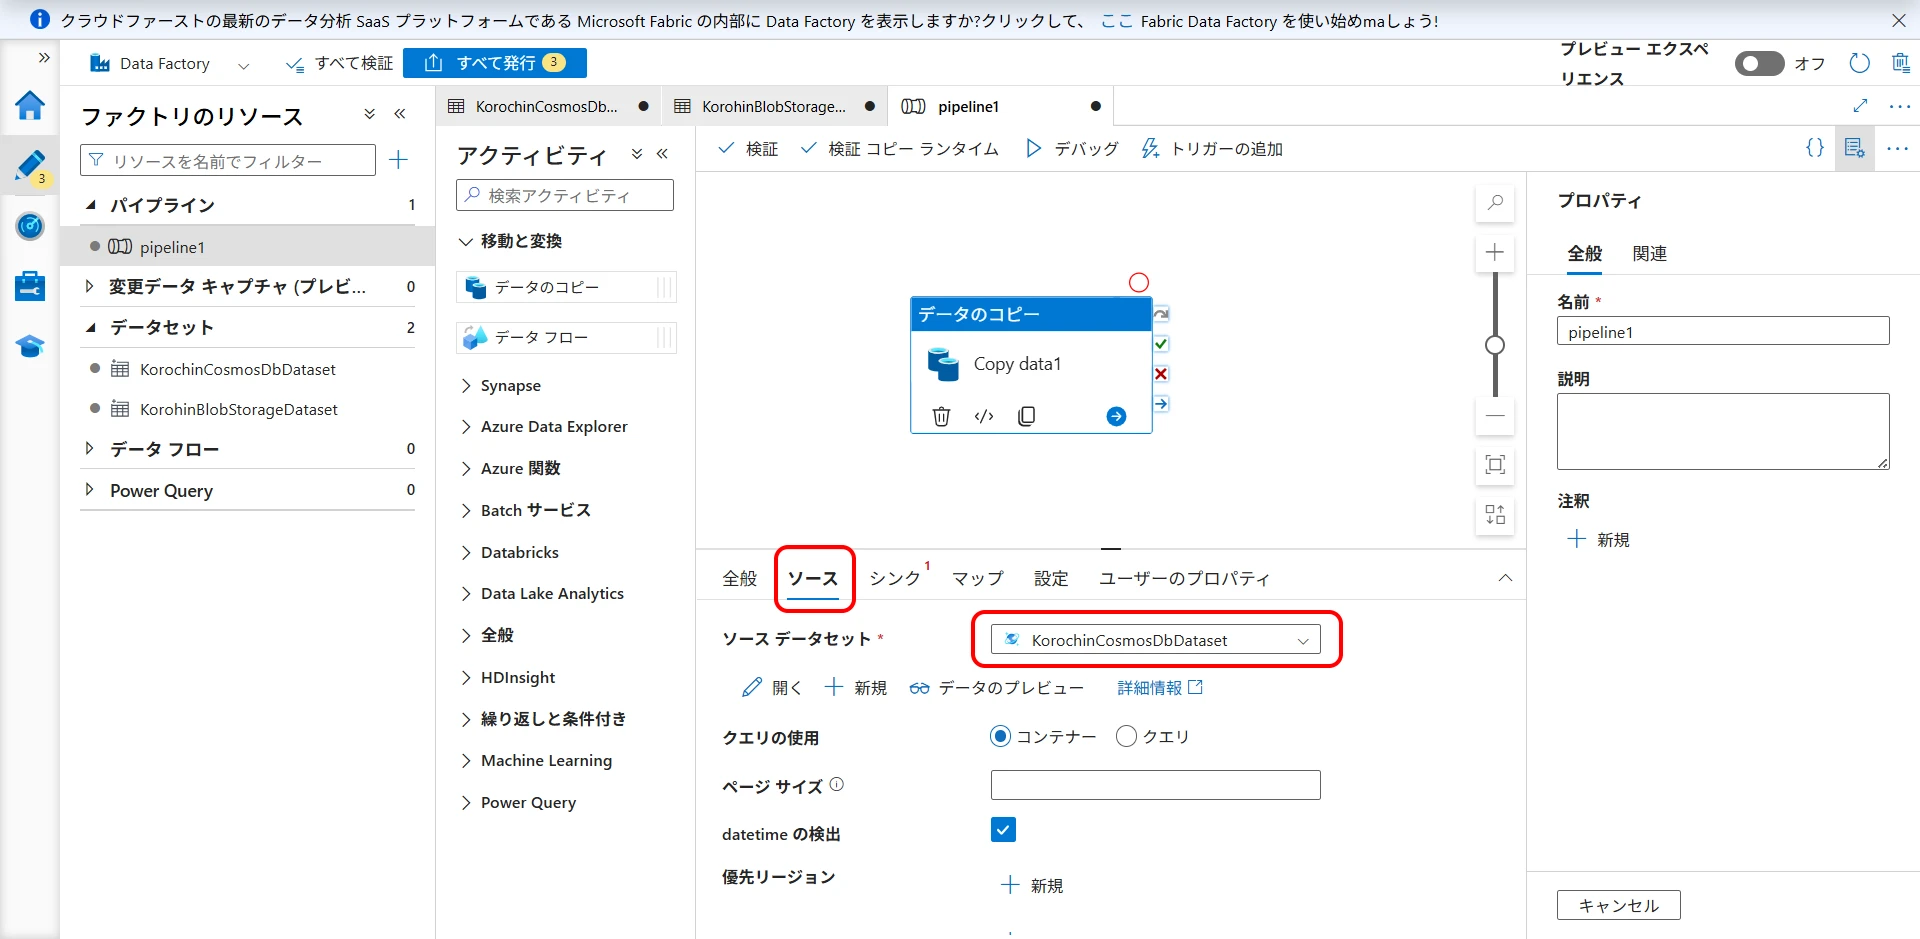
On the "Sink" tab, select the Blob Storage dataset (Figure 20).
Figure 20. Select Blob Storage dataset as sink
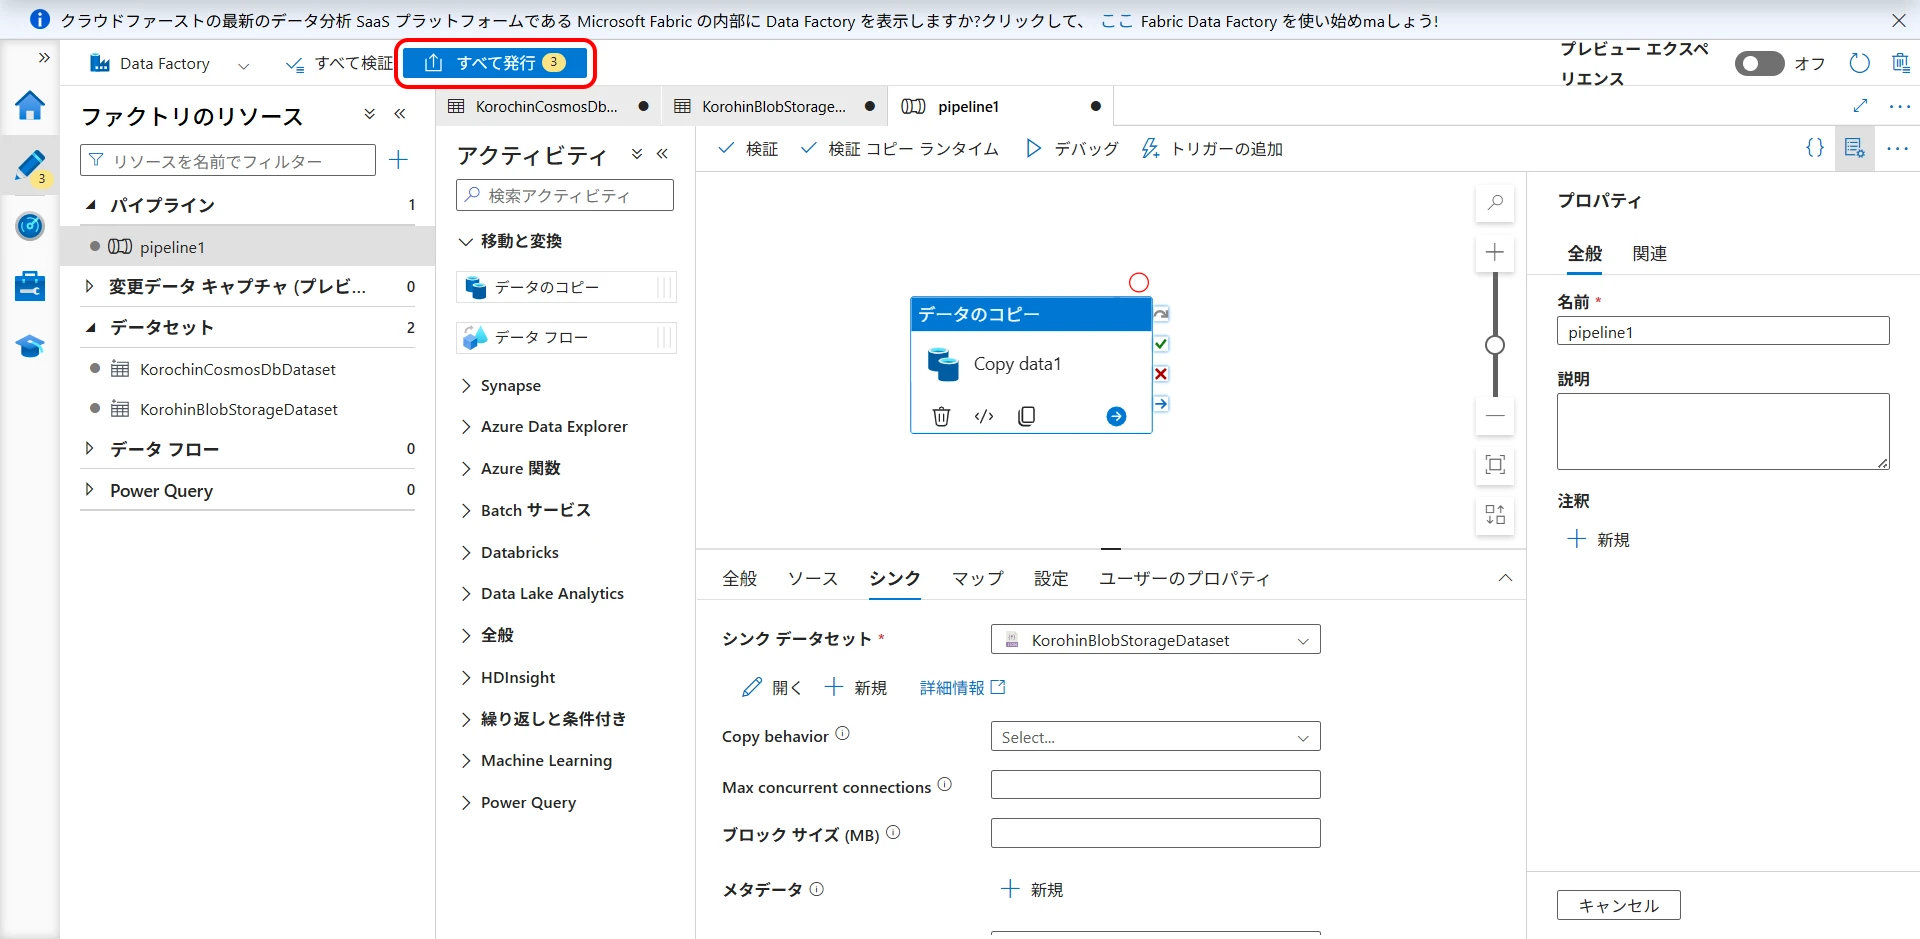
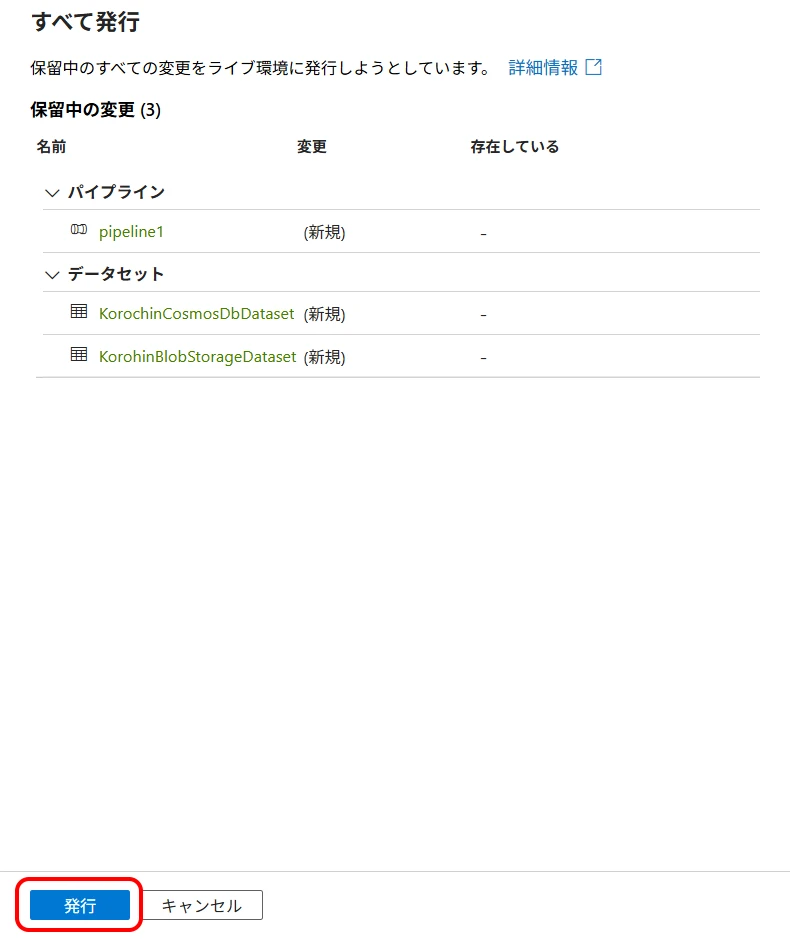
Now, click "Publish all" to confirm the creation (Figure 21, Figure 22). If you do not publish, the created datasets and pipelines will disappear when you close the browser. (Linked services will remain).
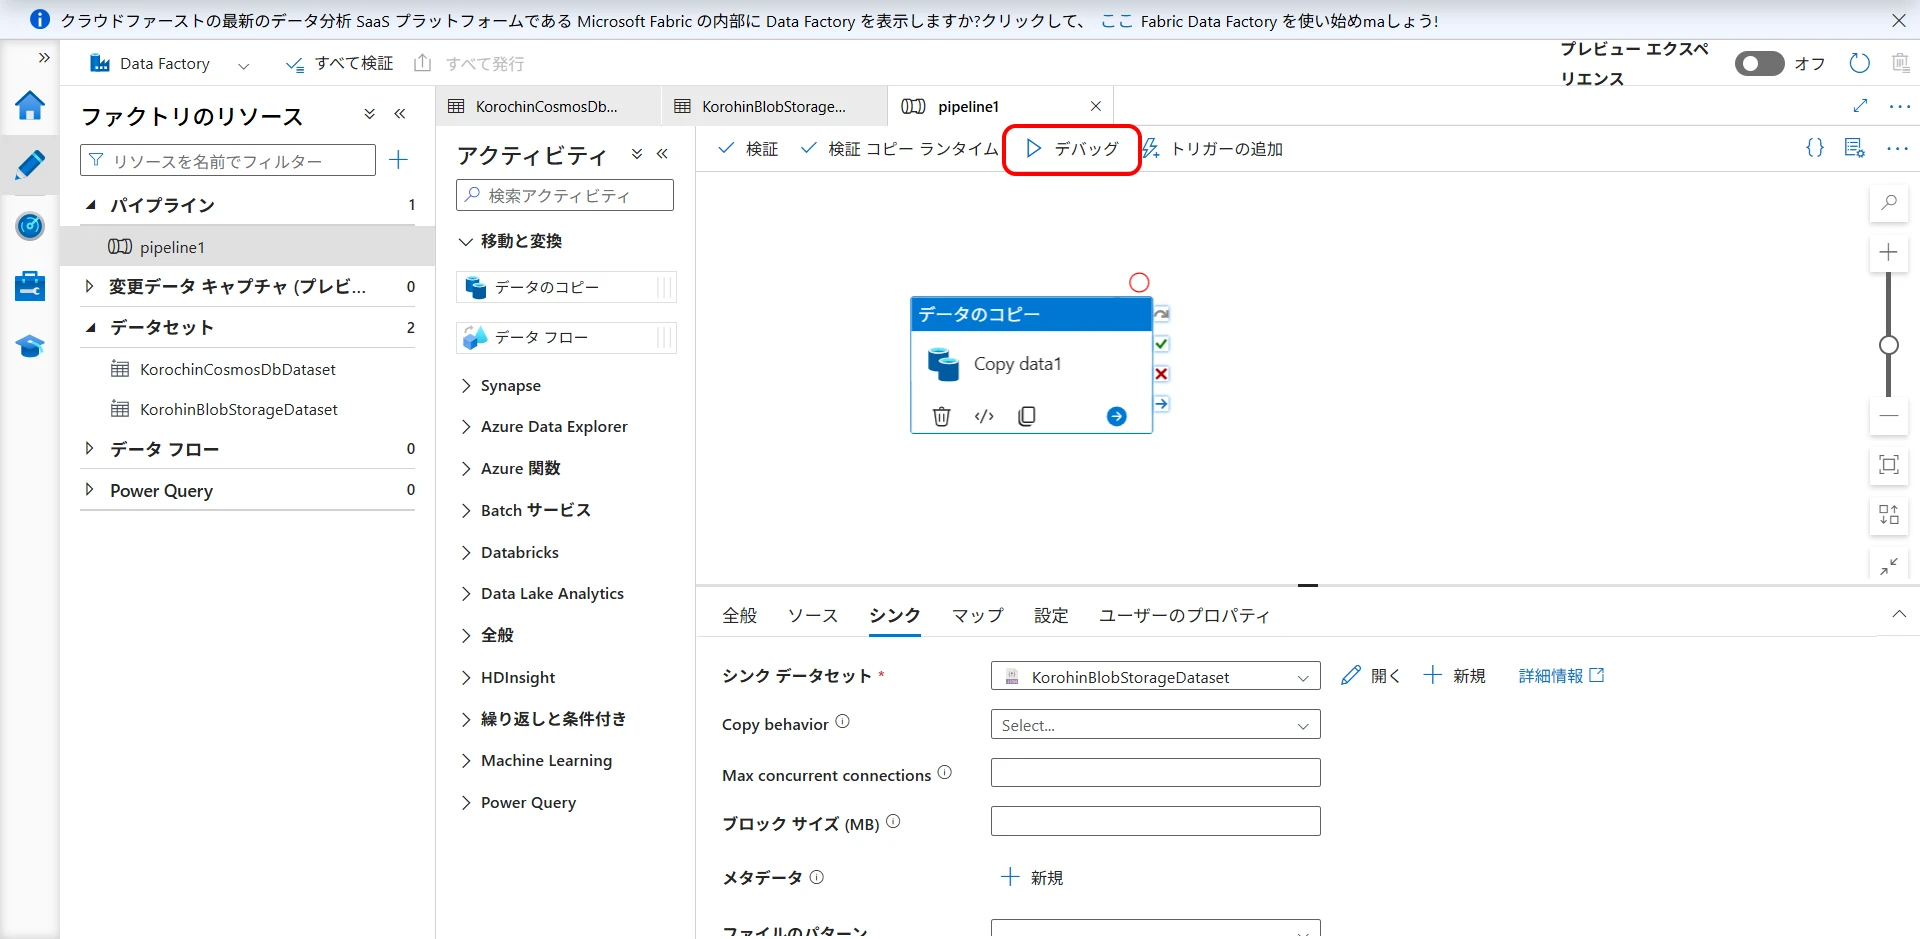
7Execute the Pipeline
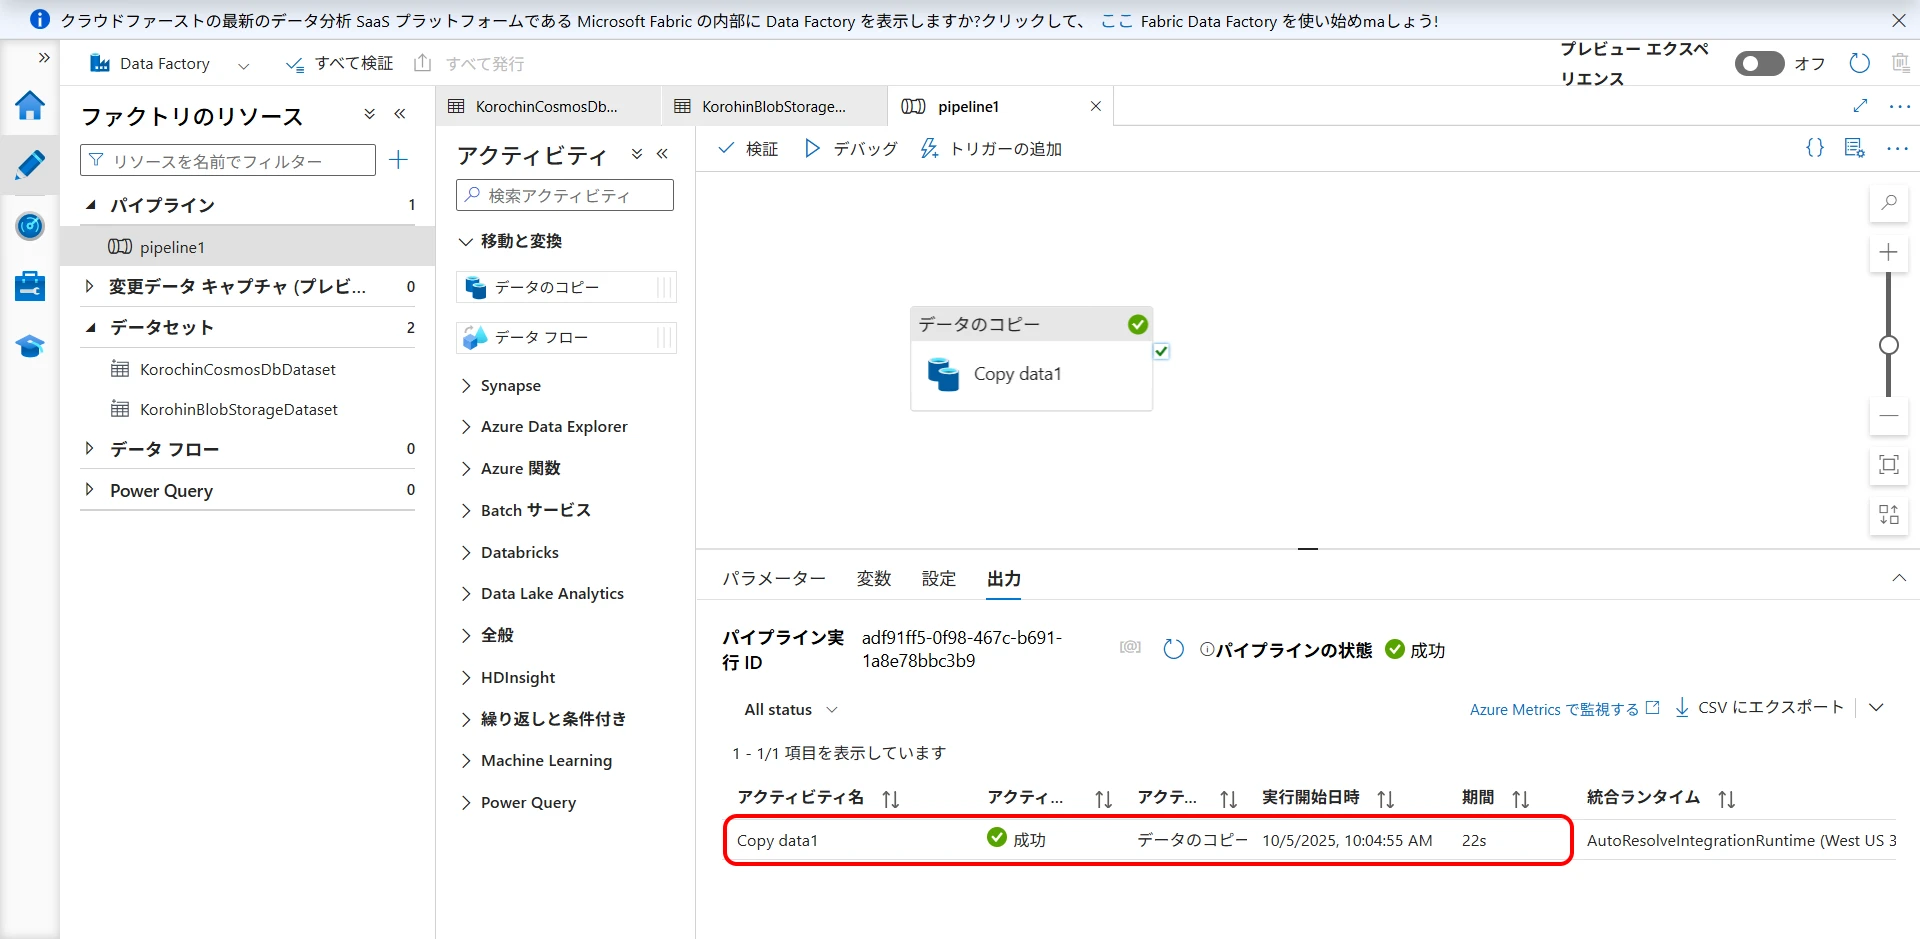
Click "Debug" to start debugging (Figure 23).
After a short wait, the execution result will be displayed as shown below (Figure 24).
8Download JSON
Navigate to the Blob Storage container/directory specified as the output destination. The file will be created, so select "Download" from the context menu (Figure 25).
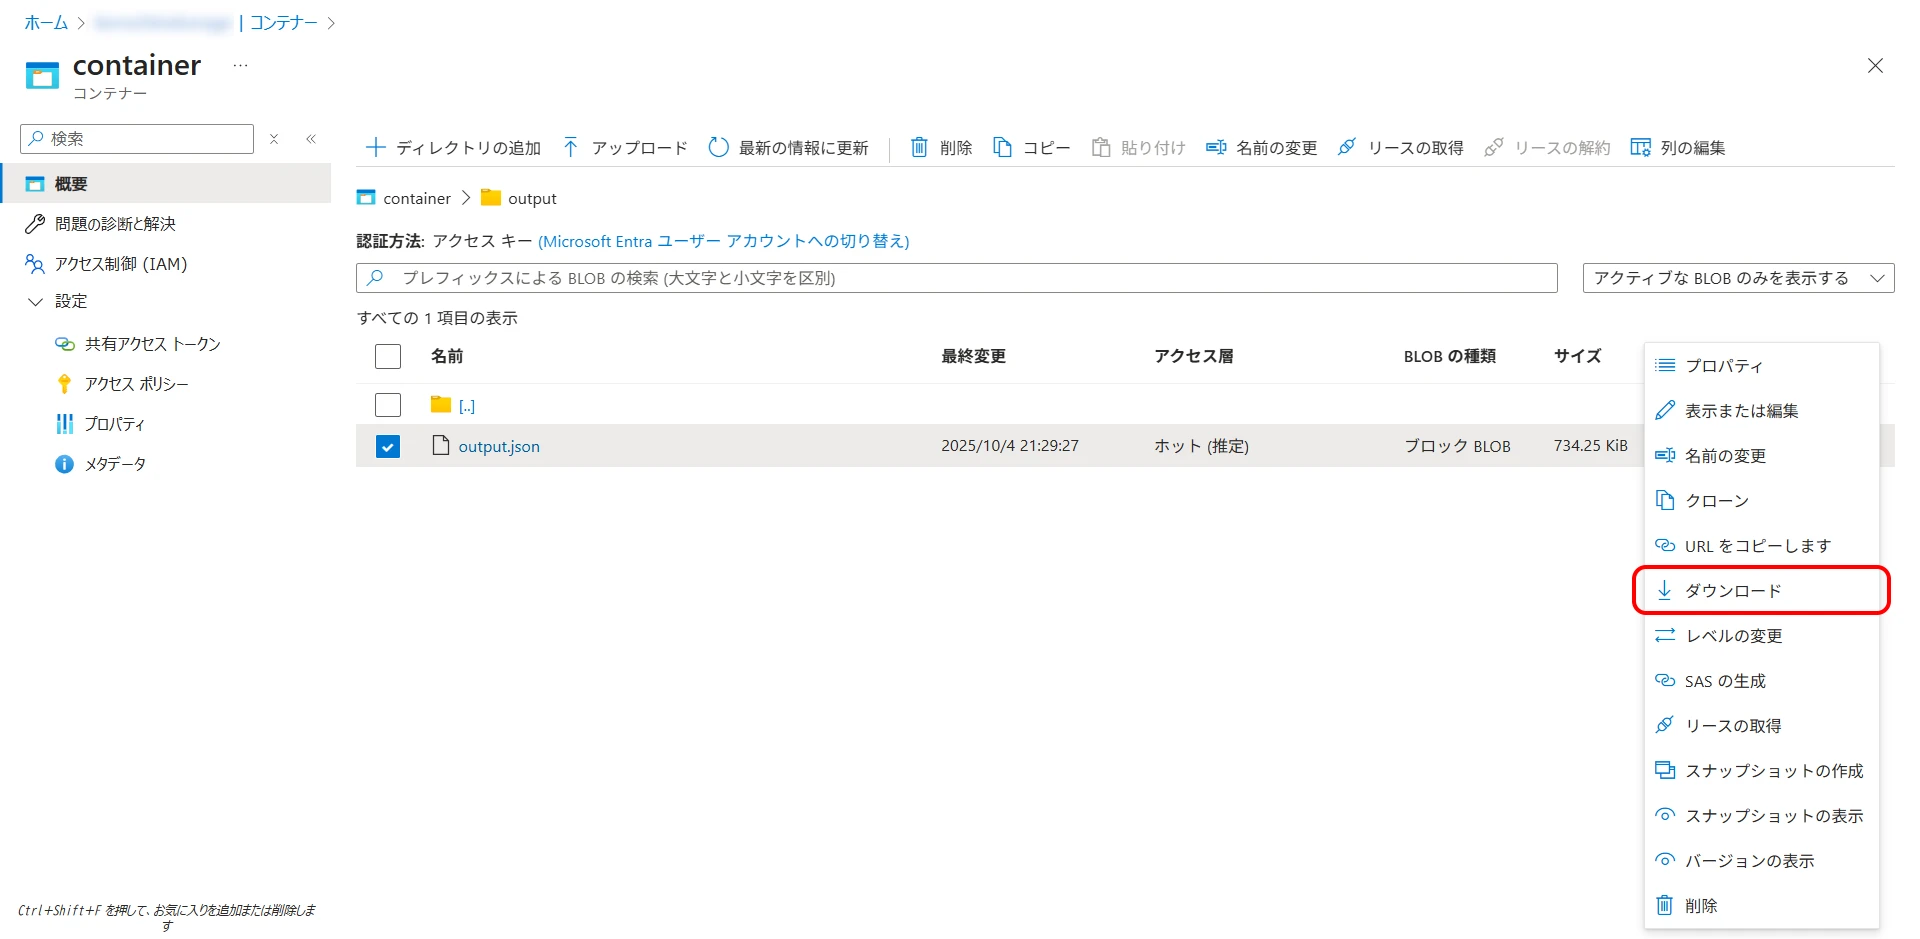
The procedure for backing up Cosmos DB using Azure Data Factory is complete.
In this example, the output file name was fixed, but you can also specify a dynamic file name.
- Add a parameter to the sink dataset (Figure 26).
Add a String type parameter named
filename.
Figure 26. Add filename parameter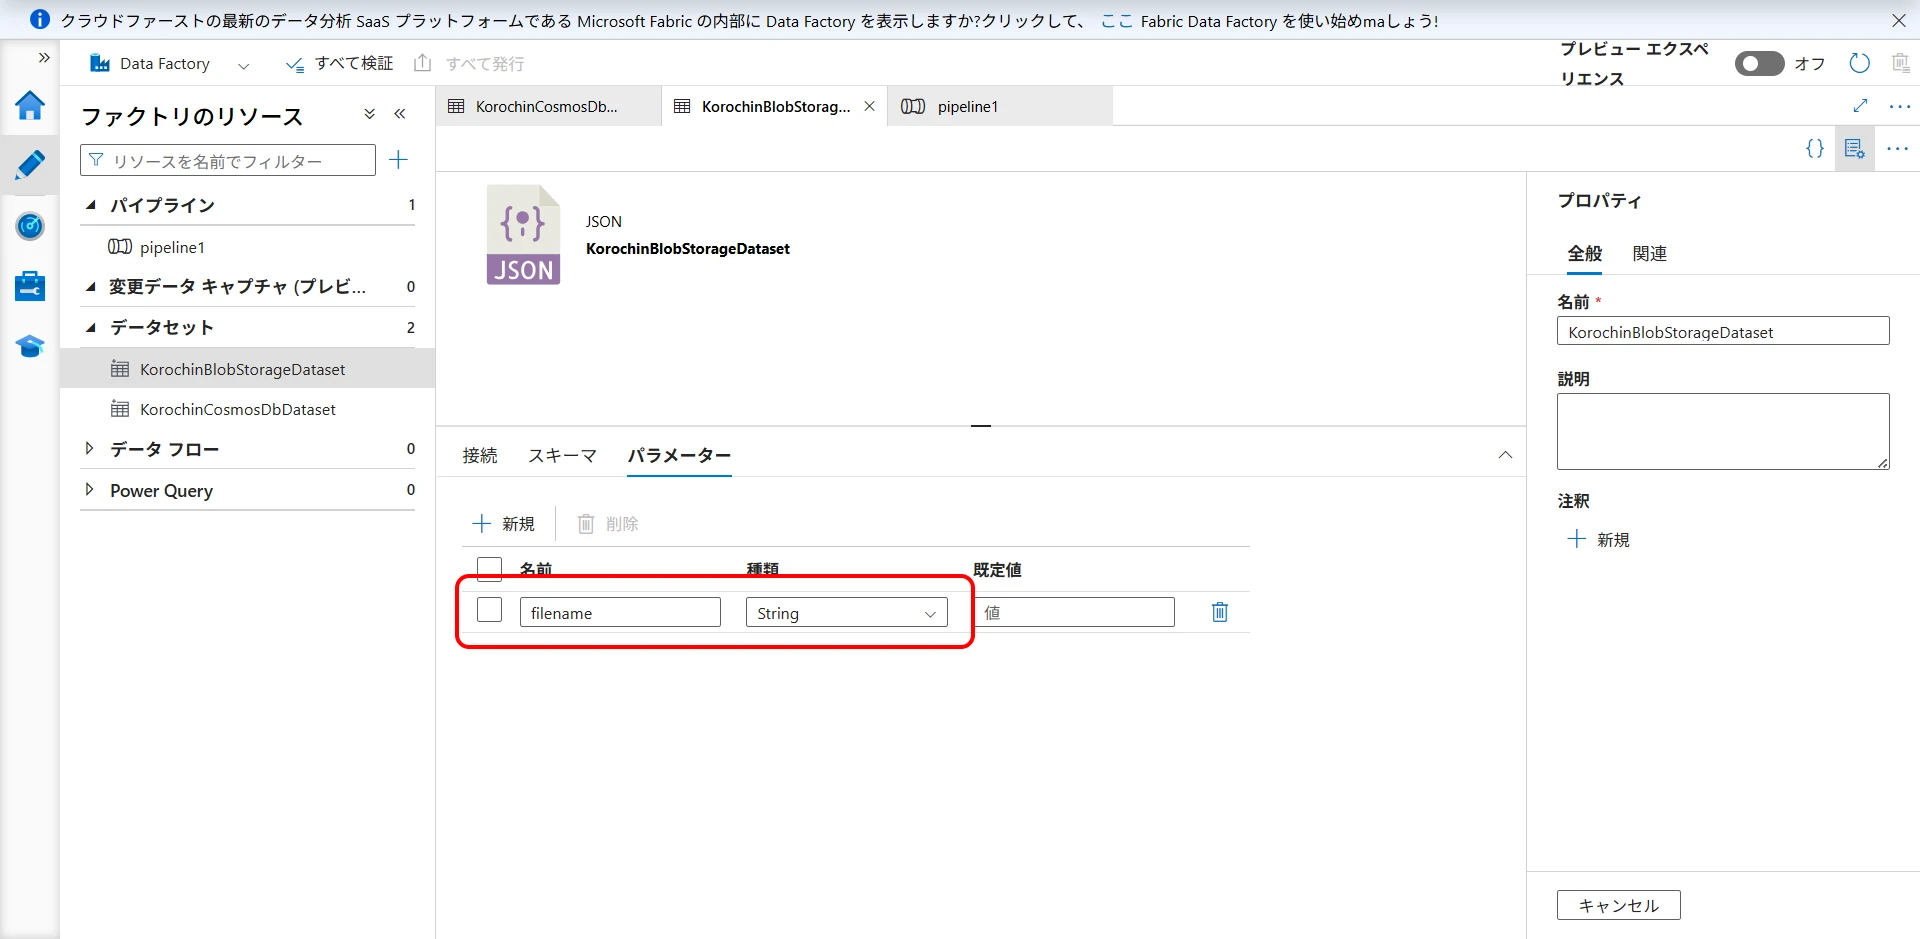
Copy data activity>Sink>Dataset propertiesin the pipeline. Set the following expression forfilename(Figure 27).
@concat('output_', formatDateTime(utcNow(), 'yyyyMMddHHmmss'), '.json')
Figure 27. Set expression for filename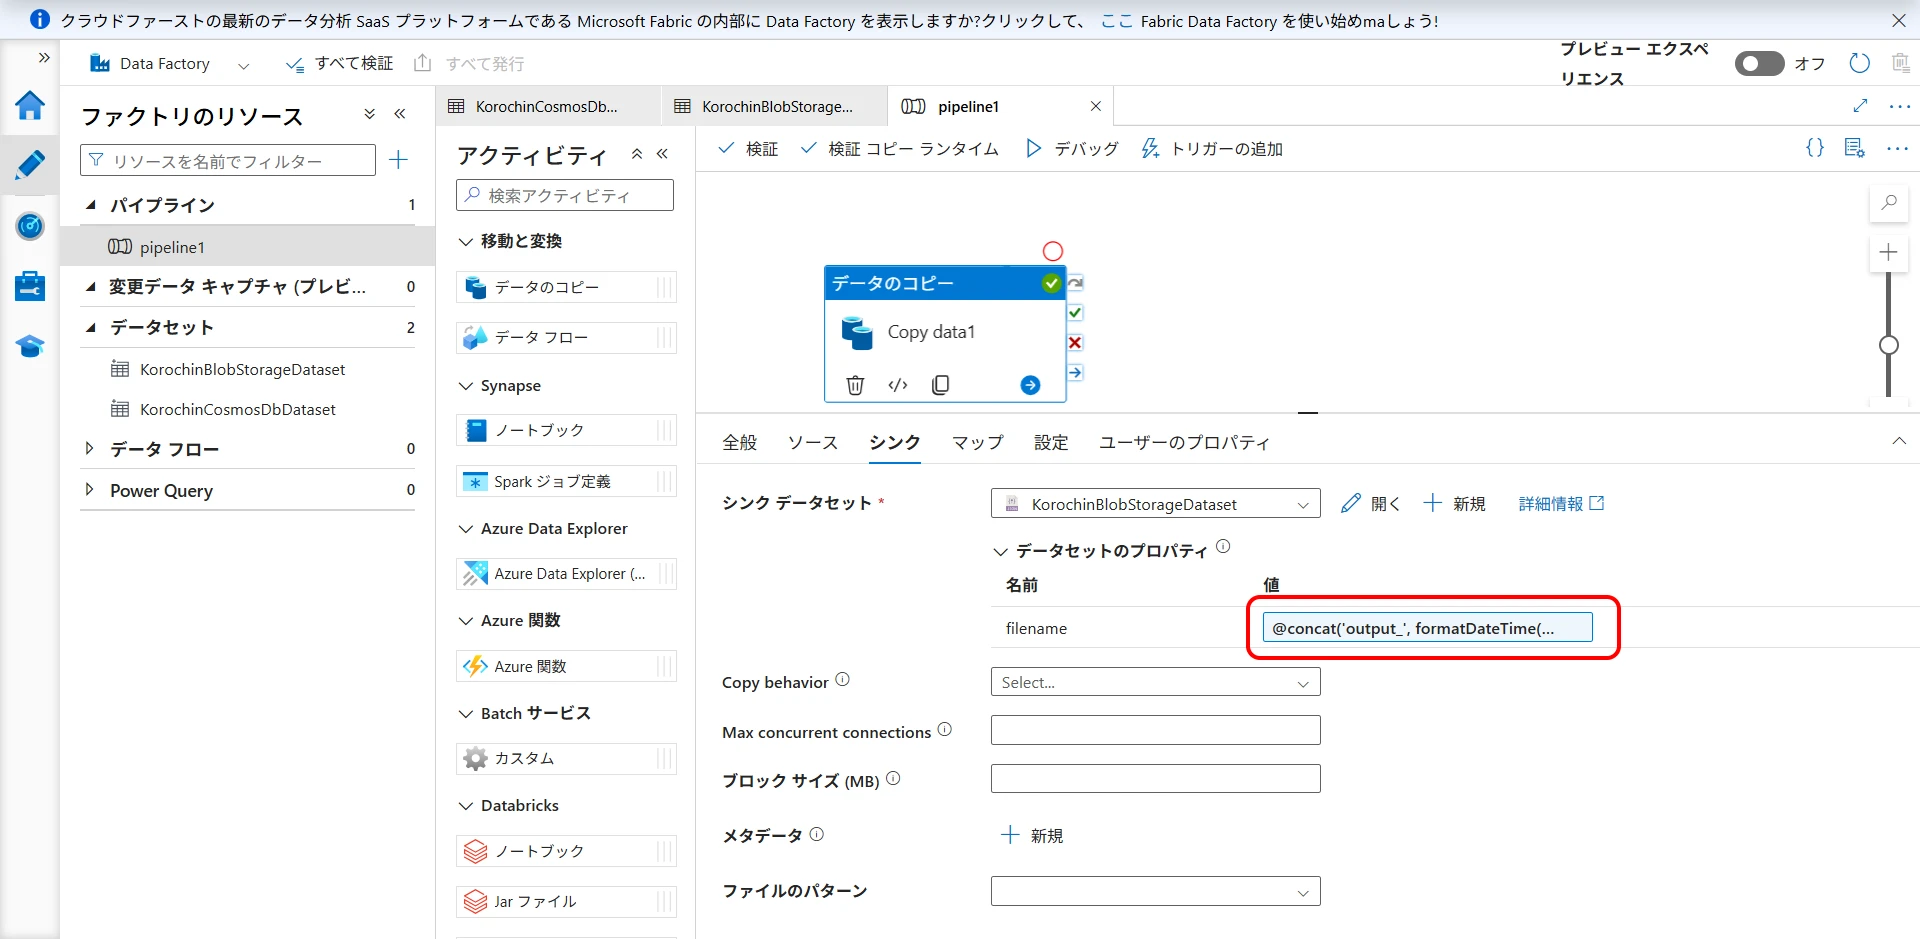
With this, the file will be output with a name like output_yyyyMMddHHmmss.json (time is UTC).
You can also add a trigger to execute it periodically, making it possible to back up Cosmos DB data to Blob Storage at a fixed time daily.
Backup via SDK
Another method is to write your own program to save data locally.
- Retrieve data using .NET / Python / Node.js SDK and save it to local JSON.
- If combined with the Change Feed API, incremental exports are also possible.
SELECT * FROM c
This can retrieve all items, and then you can process them as needed.
References
Azure Cosmos DB の定期的なバックアップと復元 Azure Cosmos DB Desktop Data Migration Tool Azure Data Factory とは何ですか